Keep Shopify Fast: 2048×2048 AI Backgrounds That Scale
Shopify native workflow for AI backgrounds. Keep images 2048×2048 WebP under 500KB, preserve on brand consistency, and scale image generation with Ecom-eye.
Keep Shopify Fast: 2048×2048 AI Backgrounds That Scale
For a single hero shot, use Shopify’s built-in Magic media editor to strip and replace a background in seconds. For hundreds of SKUs, that same tool becomes a bottleneck, so switch to an automated, Shopify-native workflow that generates images at 2048×2048, exports as WebP with a file size kept as low as possible for fast loading, and pushes straight to your store. Keep file sizes small to preserve page speed.
TL;DR:
- Batch image generation should use templates tied to product attributes to ensure visual consistency across large catalogs.
- Export images at 2048×2048 pixels in WebP format under 500KB for optimal site speed and quality.
- Use background removal tools that preserve product scale and true color, reverting to neutral backgrounds if they fail to maintain consistency.
- Run a pilot batch of 20-30 SKUs to verify image quality, file sizes, and page speed improvements before full catalog rollout.
- Rely on Shopify’s native media editor for small batches, but switch to automated, Shopify-native workflows or external generators for hundreds of SKUs.
Table of Contents
- Choosing between the built-in editor, a Shopify app, or an external AI generator
- How to remove, replace, or extend a product background in Shopify
- Exact image specs that protect your site speed and conversions
- Scaling background generation across a full catalogue
- When simplicity beats a creative AI background
- Generate and export AI backgrounds at catalogue scale with Ecom-eye
- Sources
- FAQ
Choosing between the built-in editor, a Shopify app, or an external AI generator
The right tool depends entirely on how many products you’re editing this week, not which tool has the flashiest demo.
Shopify’s own media generation, tucked into the file editor, handles background removal, colour-swap replacement, and basic scene generation from a text prompt. It also does simple outpainting, extending a photo’s canvas to fit a new aspect ratio. It’s the fastest route for one image, or a handful, because there’s no export step and no third-party account. The catch is throughput: Shopify’s media editor is built around editing one file at a time, and some of its generative features only work on desktop.
A Shopify app that integrates directly with your product catalogue is the sensible middle ground once you’re past 20 or 30 SKUs. These tools batch edits, apply a consistent background style across a collection, and write straight back into your store’s media library, which saves the manual upload cycle that eats an afternoon fast.
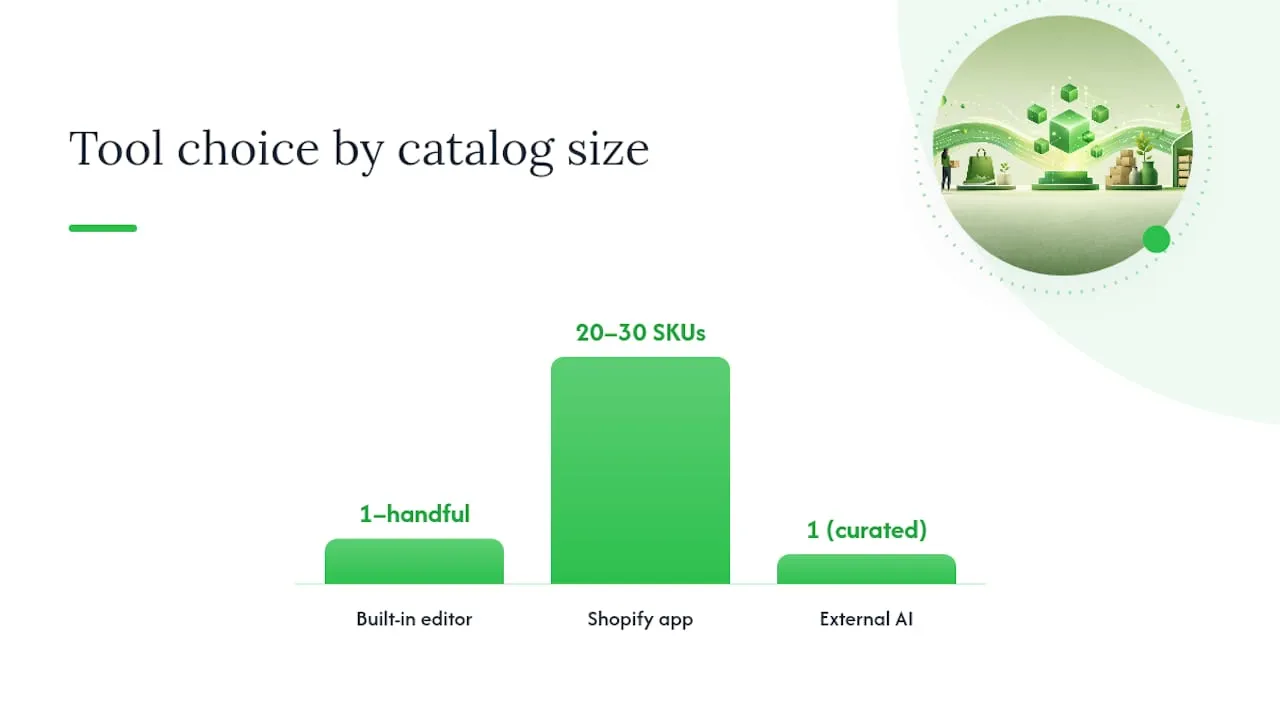
External AI generators, such as Adobe Firefly’s background tool or CapCut’s generator, offer more creative range: finer prompt control, multiple aspect ratios, and style presets that a native Shopify tool won’t match. Firefly detects the subject automatically and blends lighting realistically, while CapCut is a solid free option for quick, style-consistent variants. Both require you to export the finished file and upload it manually, which is fine for a curated hero shot but painful at catalogue scale.
Run through this before picking a route:
- Catalogue size: under 30 products, the built-in editor is fine. Above that, batching matters more than creative flair.
- Need for consistent templates: if every product needs the same backdrop style, a templated workflow beats one-off prompts.
- Budget: Shopify Magic is included; apps and external generators carry their own cost or credit structure.
- Speed: how many images need turning around this week, not this quarter.
- Editorial control: how much you need to approve or tweak each result before it goes live.
How to remove, replace, or extend a product background in Shopify
Before touching any tool, pick photos with a clean, well-lit subject and keep the original files at a high resolution, ideally 2048px square or larger, in a backed-up folder. You can’t upscale your way out of a blurry starting photo.
- Remove the background. Use automatic subject detection in your chosen tool, then check the mask edges around fine detail like fabric texture or jewellery clasps, correcting by hand where the AI has clipped too aggressively.
- Save for transparency if needed. Shopify’s editor only preserves transparency when you export as PNG; export as WebP and you lose the cutout effect entirely.
- Generate or replace the background. Write a short, specific prompt covering style, setting, and lighting, for example “matte grey studio backdrop, soft top light, subtle shadow beneath product.” Generate several variants and pick the one that keeps the product’s true colour and proportions intact.
- Outpaint if you need a different aspect ratio. Extending the canvas to fit a banner or a square thumbnail works well as long as you don’t stretch the subject itself; check that scale still looks natural after the extension.
- Export at the right settings. WebP for standard colour images, PNG only when you need transparency. Target 2048×2048 pixels and keep the file under 500KB.
- Name the file and add alt text before uploading, both help with search visibility and internal organisation once your media library grows past a few hundred assets.
- Check the result inside your theme. Look at the thumbnail, the zoomed product view, and the collection grid. Watch for unexpected cropping, stretched proportions, or layout shift as the image loads.
Pro Tip: Generate three or four background variants per product in one sitting, rather than one at a time across separate sessions. It keeps your prompt style consistent and saves you from re-explaining the mood you’re after to the tool every single time.
Shopify’s generative features can also lose unsaved work if you close the editor before exporting, so save each variant before moving to the next image rather than batching approvals for later.
Exact image specs that protect your site speed and conversions
Shopify’s own guidance is specific and worth following to the pixel: product images at 2048×2048 px, a 1:1 aspect ratio, and a file size kept under 500KB. Go bigger than that and you’re not adding quality your customer can see, you’re just adding load time they’ll notice.
Format matters as much as dimensions. WebP produces files roughly 25 to 35% smaller than JPEG at equivalent visual quality, which on a 40 image collection page adds up to a genuinely faster load. Reserve PNG for images that need a transparent background, since it doesn’t compress as efficiently for standard photos. AVIF is worth testing if your theme supports it, but treat it as experimental rather than your default for now.
Practical targets to work from:
- Main product images: 2048×2048 px, WebP, under 500KB.
- Thumbnails and collection grid images: smaller dimensions, ideally under 100KB, since these load in bulk on category pages.
- Banners and hero images: larger canvas, but still compressed hard, since these often sit above the fold and directly affect perceived load speed.
- Transparent cutouts: PNG, accepting the larger file size as the trade-off for the effect.
Upload the highest-quality master you have and let Shopify’s theme and CDN serve responsive variants to different devices, rather than manually uploading multiple resized copies. Oversized masters slow down processing on Shopify’s end without any visible benefit on a phone screen.
A two-pass check catches most quality problems before they go live: inspect the image at 100% zoom for artefacts or smudging around edges, then run it through a compressor and confirm the file size lands under your target without visible degradation. Batch tools exist for this, but even a manual spot-check on your first ten images will tell you whether your prompt style and export settings are producing clean results before you commit hundreds of SKUs to the same pipeline.
Scaling background generation across a full catalogue
Editing one image at a time works until it doesn’t. Somewhere around the hundred-SKU mark, most merchants hit a wall where manual editing simply can’t keep pace with new stock arriving weekly, and that’s where a bulk, Shopify-native pipeline earns its keep.
A workable version of that pipeline looks like this: import product data from your supplier or existing store, define a small set of prompt templates tied to product attributes (colour, material, use case), generate image variants at your target specs, batch optimise and rename the files, then export in one pass directly to Shopify. Building the prompt template once, rather than reinventing it per product, is what keeps a thousand SKUs looking like they belong to the same brand rather than a hundred different photoshoots.
Duplicate content is the quiet risk hiding inside this process. Pulling stock photos straight from AliExpress or a competitor’s listing creates duplicate images and duplicate descriptions across the web, and that’s a direct path to poor SEO rankings and Google Merchant disapprovals. It’s also worth remembering that FTC truth-in-advertising principles still apply once AI starts altering product context. A generated backdrop is fine; a background that makes a product look like it does something it doesn’t is not.
This is precisely the gap Ecom-eye was built to close. It automates bulk imports from AliExpress, Amazon, Temu, or a competitor’s Shopify store, then generates unique, SEO-ready product pages alongside high-quality AI product images, all exportable to Shopify in one click, without the copyright exposure of scraped photos or duplicated copy.
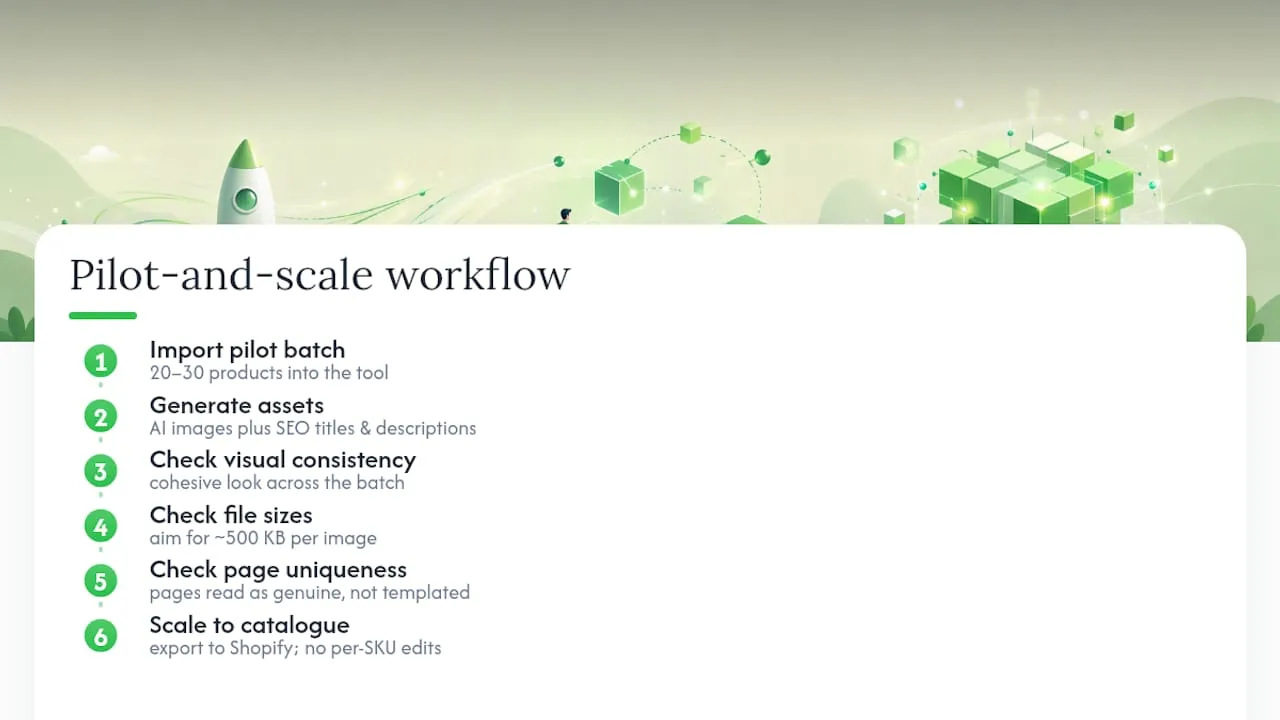
Pro Tip: Roll out any bulk image pipeline in a small pilot batch first, twenty products, not two hundred. Check image quality, confirm file sizes are hitting your target, and watch page speed and conversion for a week before scaling up. Keep a rollback plan ready in case a template needs adjusting.
A rollout checklist worth sticking to:
- Run a pilot batch of 15 to 25 SKUs before committing the full catalogue.
- Define QA criteria upfront: colour accuracy, shadow realism, and file size compliance.
- Monitor page speed and conversion rate for at least a week after go-live.
- Keep original images archived so you can revert instantly if a template underperforms.
When simplicity beats a creative AI background
Most merchants over-correct once they discover what AI backgrounds can do. A moody studio scene looks impressive in isolation, but stack twenty of them with slightly different lighting and colour temperature across a collection page, and the grid stops feeling like one store.
The rule I’d apply to every image before it ships: does the background preserve the product’s true colour, its real scale, and a shadow that looks physically plausible? If any of those three slip, revert to a plain, neutral backdrop rather than pushing a more elaborate scene through. Consistency across a catalogue does more for conversion than any single striking image ever will, and a mismatched background undermines trust faster than a plain one ever could.
Save the creative scenes for a handful of hero shots that genuinely support a buying decision, seasonal campaigns, lifestyle context, a product in actual use. Everywhere else, boring and consistent wins.
— Koen
Generate and export AI backgrounds at catalogue scale with Ecom-eye
There are practical routes for merchants who’ve outgrown one-by-one editing and need hundreds of product images generated, optimised, and exported without touching a file manager. Some tools handle bulk import from various suppliers or competitor stores, then generate copyright-safe AI product images alongside SEO-ready titles and descriptions in the same pass, all exportable to Shopify in one click.
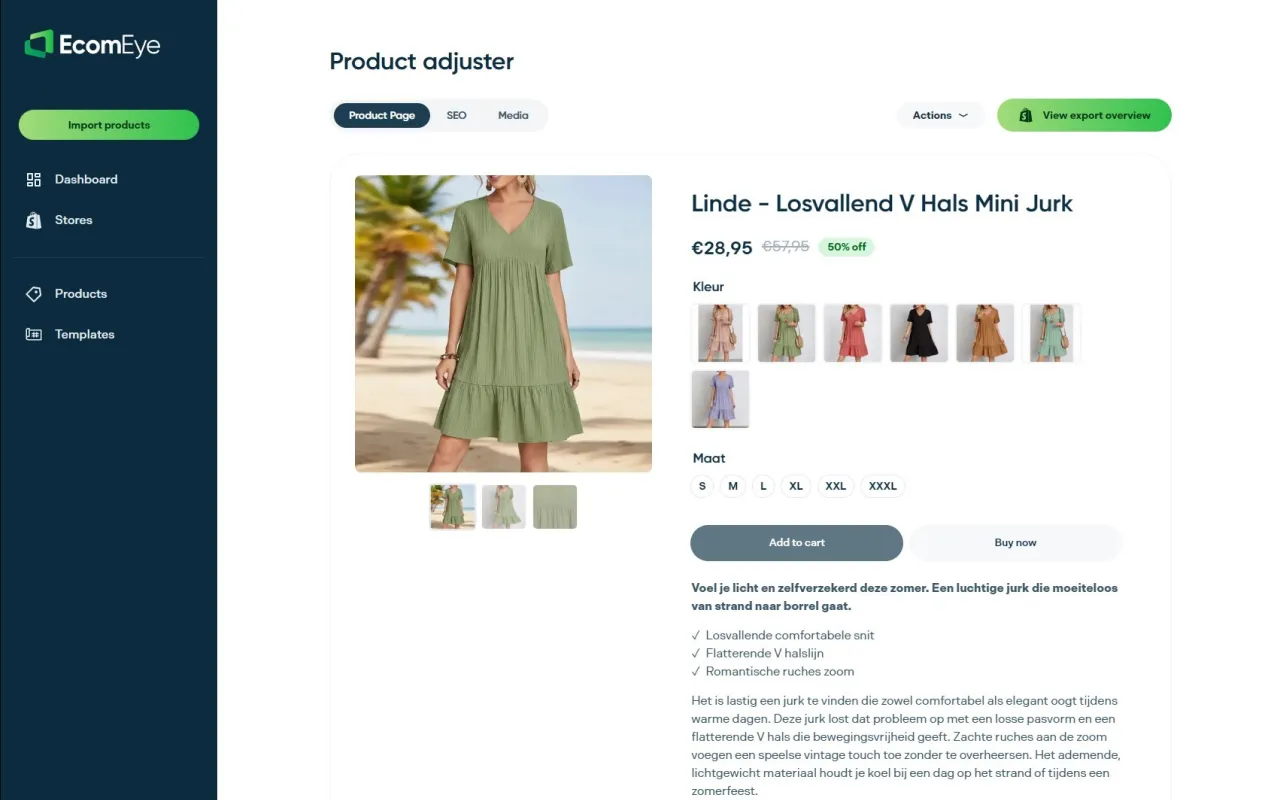
Start with a pilot batch rather than your full catalogue. Import twenty to thirty products, generate the image set, and check three things before scaling: visual consistency across the batch, whether file sizes land near your 500KB target, and whether the pages read as genuinely unique rather than templated. If those hold up, the same workflow scales to your entire store without repeating the manual work per SKU.
The AI product image generator handles the visual side directly, while the AI product description generator covers the copy that goes alongside it, so a full product page, images and text, comes out ready for Shopify in one workflow. Run a free pilot batch and measure the results against what manual editing was costing you in hours each week.
Sources
For the exact pixel and compression figures referenced throughout this piece, Cloudinary’s Shopify image size guide is the clearest primary reference. Shopify’s own media generation documentation covers feature limits and desktop-only caveats in more detail than most third-party guides. For prompt patterns and creative range beyond Shopify’s native tools, both Adobe Firefly and CapCut publish their own generator documentation worth a quick look before you commit to a workflow.
- Cloudinary — Shopify image sizes guide
- Shopify Help Center — Media generation in the file editor
- Adobe Firefly — AI background generator
- CapCut — AI background generator
FAQ
How do I add an AI-generated background to a product image?
Use an automatic background remover to isolate the subject, then either apply a plain colour, generate a new scene from a text prompt, or outpaint the existing canvas. Shopify’s file editor does all three natively, or you can use Firefly or CapCut and upload the finished file.
How do I add a background image inside Shopify itself?
Open the product image in Shopify’s media editor, select the background tool, and choose to remove, replace with a colour, or generate a new scene from a prompt. Export as PNG if you need transparency, or WebP for a standard compressed image.
Can you realistically make $10,000 a month on Shopify?
Some stores reach that figure, but it depends heavily on niche, margins, and consistent execution rather than any single tactic; clean, fast-loading, unique product pages are one of the more reliable levers, since duplicate or low-quality content directly suppresses search visibility and Merchant approval.
Does Kim Kardashian use Shopify?
Skkn by Kim, her skincare brand, has run on Shopify’s platform, part of a broader pattern of major direct-to-consumer beauty and fashion brands choosing Shopify for its combination of storefront flexibility and backend tooling.
What image size does Shopify recommend for product photos?
Shopify recommends 2048×2048 pixels at a 1:1 aspect ratio, saved as WebP where possible, with a target file size under 500KB to protect page loading speed.
Ready to boost your product pages?
Generate high-converting, SEO-optimized product pages in bulk using AI automation used by e-commerce experts.
No credit card required