Bulk edit alt text in Shopify: methods for every catalogue size
Discover efficient methods to bulk edit alt text in Shopify, tailored for any catalogue size, and optimize your image SEO quickly.

Bulk edit alt text in Shopify: methods for every catalogue size

Three methods cover almost every situation. For fewer than 10 images, edit alt text one by one in the Shopify admin. For a moderate batch, use the bulk editor or the Files spreadsheet view. For anything past a few hundred images, export a CSV (or use Matrixify) and re-import, or hand the job to an AI generation app. Each has a different time cost: admin edits take seconds per image but scale terribly, spreadsheet methods take an afternoon regardless of catalogue size, and AI apps take minutes but need human review afterwards.
Before touching anything:
- Export your current product catalogue as a backup CSV.
- Pick a small test subset (10 to 20 images) to trial your chosen method.
- Choose the method that matches your catalogue size, not the one that sounds most impressive.
Key Takeaways
Bulk editing alt text on Shopify works best when the method matches catalogue size: admin edits for small fixes, CSV or Matrixify for hundreds of images, and AI generation for large or fast-moving catalogues.
| Point | Details |
|---|---|
| Match method to scale | Use admin edits under 10 images, bulk editor up to 200, CSV or Matrixify beyond that. |
| Always export a backup first | Keep the original CSV so you can revert instantly if an import goes wrong. |
| Trim CSVs to essential columns | Export only Handle, Image Src, and Image Alt Text to keep files small and safe. |
| Never edit Image Src | It’s the matching key on import; editing it breaks the alt text mapping. |
| Automate content generation with Ecom-eye | Ecom-eye generates titles, descriptions, and image content together, exporting to Shopify in one click. |
Table of Contents
- Comparing methods for bulk alt text editing on Shopify
- How do you edit alt text for a single Shopify image?
- Can you bulk edit alt text without leaving the Shopify admin?
- How do you bulk edit alt text using a CSV file?
- How does Matrixify handle bulk alt text updates?
- Should you use an AI app to generate alt text automatically?
- When should you use the Shopify Admin API for alt text updates?
- What makes good alt text for Shopify product images?
- How do you check that bulk alt text updates worked?
- What actually matters when you bulk edit alt text
- Automate alt text and product content with Ecom-eye
- Essential guides for bulk alt text editing
- Sources
- FAQ
Comparing methods for bulk alt text editing on Shopify
Here’s how the main options stack up when you’re deciding where to spend your afternoon.
- Admin single edits: best for under 10 images, takes a few minutes, no skill needed. Pro: zero setup. Con: unworkable past a handful of products.
- Bulk editor / Files view: best for 10 to 200 images, takes 30 to 90 minutes, needs basic spreadsheet comfort. Pro: no import risk. Con: limited to what’s visible in-admin.
- CSV export/import or Matrixify: best for 200 to 10,000+ images, takes an afternoon to set up then minutes to run, needs comfort with spreadsheet formulas. Pro: full control, repeatable. Con: re-import risk if done carelessly.
- AI generation apps: best for large or fast-growing catalogues, takes minutes to run, needs review time. Pro: speed. Con: quality varies without oversight.
Choose the bulk editor if you’re clearing a backlog under 200 images this week. Choose CSV or Matrixify if you want a repeatable process you’ll run again next quarter.
How do you edit alt text for a single Shopify image?
For quick fixes, Shopify’s native editor works fine and needs no extra tools.
- Go to Products in your Shopify admin and open the product you want to fix.
- Scroll to the media gallery and click the image that needs new alt text.
- Select Edit alt text, type the description, and save.
This suits last-minute corrections, a mislabelled hero image, or a one-off accessibility fix. It’s manual, offers no spreadsheet view, and becomes painfully slow once you’re touching more than a handful of images across multiple products.
Can you bulk edit alt text without leaving the Shopify admin?
Yes, for moderate batches. Shopify’s admin has a Bulk Editor: select multiple products from the Products list, click Edit products, then add the “Image alt text” column from the column picker. You can then type directly into each row without opening individual product pages.
Some stores also have access to a Files view showing images in a grid or spreadsheet layout, though this often only surfaces primary product images rather than every image in a gallery. That’s the limitation worth knowing before you rely on it.
- Use Bulk Editor when you’re updating 10 to 200 images and want to stay inside the admin.
- Use Files view for a quick visual scan of what’s missing alt text.
- Switch to CSV once you’re past a couple of hundred images. Typing into a browser grid that size gets tedious fast, and one accidental page refresh can cost you unsaved edits.
How do you bulk edit alt text using a CSV file?
The CSV route gives you the most control over every image field, and it scales to catalogues of any size. Shopify’s Help Centre confirms a CSV file can be used to upload alt text alongside the native per-image field.
- From Products, click Export, choose “All products” or a filtered selection, and export as a CSV for Excel or Google Sheets.
- Open the file and locate the Image Src and Image Alt Text columns. Image Src is the matching key on re-import, so never edit that column.
- Trim the file down. Shopify Community threads recommend exporting only image rows, or cutting the sheet to Handle, Image Src, and Image Alt Text to keep the file small and the import fast.
- Write your alt text using a formula rather than typing each row by hand. Something like
=A2 & " in " & B2 & ", front view"pulls the product name and colour into a consistent sentence. For more complex catalogues, VLOOKUP or INDEX MATCH can merge alt text generated elsewhere back into the correct rows. - Paste your formulas as values before saving, so Shopify doesn’t choke on formula syntax during import.
- Re-import the file through Products → Import, ticking “Overwrite any current products.”
- Test on 10 to 20 rows first. Keep your original export untouched so you can revert if anything goes wrong.
Pro Tip: Never delete the Image Src column and never touch it during editing. It’s the only thing Shopify uses to match your new alt text to the correct image on import, and altering it silently breaks the match.
How does Matrixify handle bulk alt text updates?
Matrixify is the app most merchants graduate to once CSV editing in raw spreadsheets starts feeling fragile. Matrixify’s own tutorial documents an export, edit, re-import flow that’s non-destructive because it matches rows precisely and gives you a report on what changed.
- Export only the Images sheet, or filter to product media, rather than pulling your entire catalogue export. This keeps file size manageable and reduces the chance of touching unrelated fields.
- Edit the Image Alt Text column exactly as you would in a plain CSV, then re-import through Matrixify rather than Shopify’s native importer.
- Read the per-row import report after every run. Matrixify surfaces pass and fail counts row by row, which tells you exactly which images failed before you find out the hard way three weeks later.
Pro Tip: Run your first Matrixify import against a duplicate test product, not your live catalogue. It costs five minutes and it’s the difference between catching a mapping error early and re-importing 3,000 rows twice.
Should you use an AI app to generate alt text automatically?
For catalogues in the hundreds or thousands, AI generation apps are usually the fastest route, though speed only counts if you check the output. Setup typically means granting the app read and write access to your product images, then configuring a template (something like “{product name} {colour} {angle}”) with a character limit.
Independent comparisons of manual, CSV, and AI methods on Shopify show AI cuts the time cost dramatically for large catalogues, but every one of those comparisons flags the same catch: unreviewed AI output tends toward repetitive, generic phrasing that says little about what’s actually in the image.
- Sample review 5 to 10% of generated alt text before approving the full batch.
- Rename or regenerate anything that reads as filler (“product image”, “item photo”) rather than a real description.
- Batch-approve once your sample passes, then schedule a recheck every few months as new products are added.
When should you use the Shopify Admin API for alt text updates?
The Admin API suits recurring automation rather than a one-off cleanup. The basic flow: identify each image by its ID or source URL, then push the new alt text value through the product images endpoint.
Build this when you’re running scheduled jobs, managing multiple stores, or feeding alt text updates through a CI/CD pipeline as part of a bigger content system.
- Batch updates in small groups to stay under Shopify’s rate limits, and log every request so a failed batch can be replayed rather than re-run from scratch.
- Test against a staging store or a handful of products before pointing scripts at your live catalogue.
What makes good alt text for Shopify product images?
Accessibility comes first, and understanding the role of e-commerce in art highlights why accurate alt text is essential for product discoverability. Screen readers read alt text aloud to visually impaired shoppers, so describe what’s genuinely in the image rather than stuffing in keywords. Keep it under roughly 125 characters, which is the widely cited practical limit before screen readers start truncating the text anyway.
A formula that scales well: “[Product name] in [colour or variant], [view or feature].” For example, “Canvas tote bag in navy, front view” or “Ceramic mug in matte black, handle detail.” It’s specific, it’s short, and it describes the actual photo rather than repeating your product title verbatim across twelve variants.
- Check for uniqueness: no two images should share identical alt text unless they’re genuinely identical.
- Avoid redundancy with the surrounding page content. If the product title already says “Navy Canvas Tote,” the alt text can lead with the colour or angle instead.
- Include visible details a sighted shopper would notice: material, colour, angle, or a distinguishing feature.
Pro Tip: Write alt text as if describing the photo to someone on the phone who can’t see it. If your description would let them picture the image accurately, it’ll usually satisfy both accessibility standards and search engines. For more on image handling generally, Ecom-eye’s guide to product image best practices covers the wider picture beyond alt text alone.
How do you check that bulk alt text updates worked?
Don’t assume a successful import means every row landed correctly.
- Spot check five to ten products using your browser’s inspector tool (right click the image, “Inspect,” check the
altattribute) to confirm the text actually saved. - Review the import result log from Matrixify or your chosen app. EditEngine’s documentation recommends reading per-row pass/fail reports rather than trusting a single “import complete” message.
- If anything’s wrong, re-import your original backup CSV to revert before making a second attempt.
What actually matters when you bulk edit alt text
Most guides on this topic treat alt text as a box to tick once and forget. That’s the wrong instinct. Alt text degrades over time, new product images arrive without it, variants get added and nobody touches the alt field, and eighteen months later half your catalogue is back to generic filenames as its only description.

The bigger gap in conventional advice is the backup habit. Plenty of tutorials walk through CSV or Matrixify imports without stressing hard enough that skipping the backup export is the single most common way merchants corrupt live product data. Trimming your export to just Handle, Image Src, and Image Alt Text isn’t just about file size. It’s a safety mechanism: fewer columns mean fewer ways to accidentally overwrite something you didn’t mean to touch.
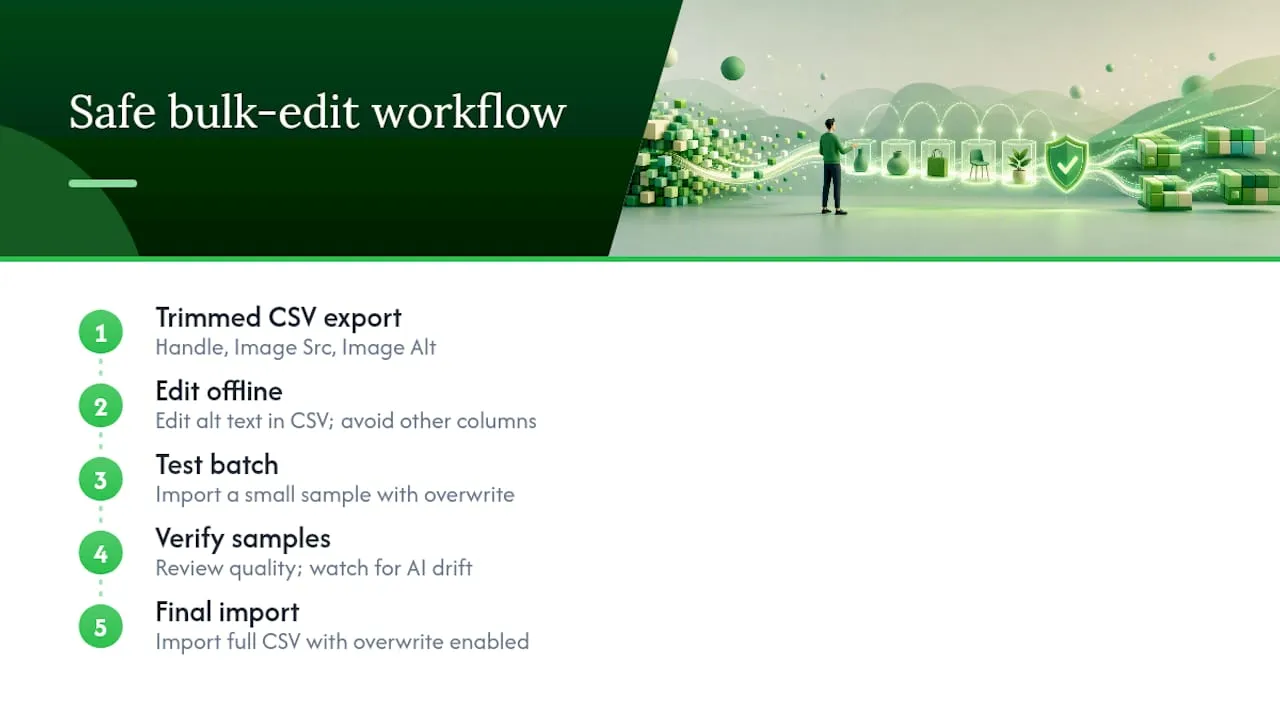
Where I’d push back on the “just use AI for everything” crowd is quality drift. AI generation is genuinely the right call for large catalogues, but only when someone actually samples the output. Left unchecked, generic AI alt text is barely better than no alt text at all, just wordier. The reader should prioritise the workflow discipline (backup, test batch, verify) well above which tool generates the words.
Automate alt text and product content with Ecom-eye
If you’re running a dropshipping catalogue that’s growing every week, manually maintaining alt text alongside titles, descriptions, and images stops being a spreadsheet problem and becomes a full-time job. Ecom-eye was built for exactly this gap: it generates SEO-optimised product pages, including image content, in bulk, from a single import of AliExpress, Amazon, Temu, or competitor Shopify links.
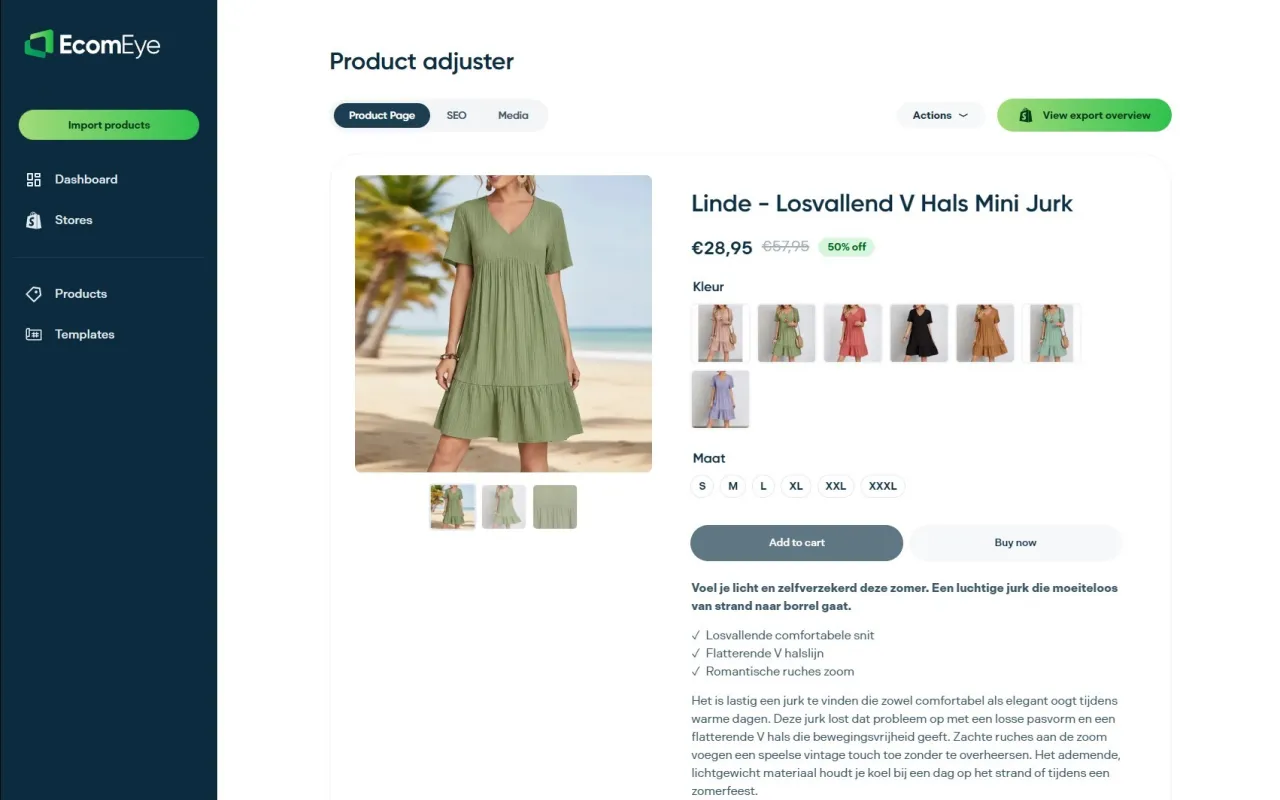
Instead of running separate CSV exports for titles, descriptions, and alt text, Ecom-eye generates the whole page (clean copyright-safe descriptions, SEO-ready titles, and AI product images) in one pass, then exports directly to Shopify with one click. There’s no rewriting competitor pages and no risk of the duplicate-content penalties that trigger Google Merchant disapprovals. For merchants scaling past a few hundred SKUs, that centralised workflow replaces the repeated CSV roundtrips this article just walked through.
Try the AI product description generator to see how a bulk import turns into finished, publish-ready pages, or pair it with the AI product image generator if you need fresh imagery alongside the copy.
Essential guides for bulk alt text editing
- Shopify Help Center: adding alt text to media covers the native admin steps and CSV upload support.
- Matrixify’s bulk alt text tutorial walks through the export, edit, re-import flow with progress tracking.
- Shopify Community’s alt text bulk editing thread explains the Images-sheet trick for smaller, safer exports.
- EditEngine’s documentation on advanced import mapping and per-row result checking.
Sources
- Bulk Update Image and Media Alt Text for Shopify Products
- Image alt text bulk editing
- How to Bulk Update Shopify Image Alt Text · EditEngine
FAQ
What’s the fastest way to bulk edit alt text on Shopify?
For catalogues under 200 images, Shopify’s Bulk Editor is fastest since it needs no export or import step. Beyond that, CSV export/import or Matrixify is quicker overall despite the setup time.
Can I bulk upload alt text using a CSV file in Shopify?
Yes. Shopify’s Help Centre confirms you can upload a CSV containing an Image Alt Text column to update alt text across many images at once during a product import.
What happens if I forget to check “Overwrite any current products” on import?
Shopify may create duplicate products instead of updating existing ones, so you always need that box ticked when re-importing an edited export of existing products.
How long should Shopify alt text be?
Keep it under roughly 125 characters, focused on genuinely visible details like colour, angle, or material rather than repeating the product title or stuffing in keywords.
Is there a way to automate alt text for a large, growing catalogue?
AI generation apps handle large catalogues fastest, though outputs still need sampling for quality. Platforms like Ecom-eye generate alt text as part of a full product page build, which removes the need for a separate bulk-edit pass entirely.
Ready to boost your product pages?
Generate high-converting, SEO-optimized product pages in bulk using AI automation used by e-commerce experts.
No credit card required