Dropshippers: Avoid Duplicate Content When Bulk Listing on Shopify
Bulk list products on Shopify without copying supplier copy. Generate unique titles and images, export CSV, test on a dev store, then import or automate.

Dropshippers: Avoid Duplicate Content When Bulk Listing on Shopify

Use the Shopify CSV import for large one-off catalogue uploads, the bulk editor for ad-hoc in-admin edits on smaller batches, apps or spreadsheet tools for ongoing supplier feeds, and the GraphQL Admin API’s bulk operations for developer-scale automation. Most store owners will only ever need the first two. The Shopify Help Centre and GraphQL Admin API cover both ends of that range, and a tool like this fits neatly between them for dropshippers generating content at scale.
TL;DR:
- Shopify’s CSV import is ideal for one-time large product uploads or updates but cannot cancel mid-process or delete products.
- The bulk editor suits small batches under fifty products for quick, in-browser edits, but performance drops with larger datasets.
- Preparing data correctly, such as keeping identifiers intact and validating the CSV file, is crucial to avoid failed imports.
- Developer-focused API bulk operations are suitable for automating extensive catalog updates across thousands of SKUs on a schedule.
- Content quality, especially unique titles and descriptions, outweighs mechanical import considerations when scaling a Shopify catalogue.
Table of Contents
- Which bulk listing method should you use?
- How do you prepare your data before bulk listing?
- How do you import or update products with a Shopify CSV?
- When should you use the bulk editor instead of a CSV?
- What is the GraphQL Admin API bulk operations workflow?
- How do you troubleshoot a failed bulk import?
- How does Ecom-eye fit into a bulk listing workflow?
- What actually matters when you’re scaling a Shopify catalogue
- Generate unique listings, then bulk export to Shopify
- Key Shopify documentation and helpful reads
- Sources
- FAQ
Which bulk listing method should you use?
Picking the right route saves hours of rework later, so match the method to what you’re actually trying to do.
- CSV import: best for one-off large imports, migrations, or refreshing hundreds of products at once. It handles bulk creation and updates well but can’t cancel mid-run and can’t delete products.
- Bulk editor and bulk actions: best for ad-hoc edits on a smaller batch, price tweaks, tag changes, or quick publish/unpublish jobs. It’s fast for dozens of items, clumsier once you’re past fifty or so.
- Apps and spreadsheet import tools: best for ongoing supplier feeds, scheduled syncs, or custom field mapping where a plain CSV falls short.
- GraphQL bulk operations: best for developers automating catalogues in the thousands, where JSONL and asynchronous processing genuinely earn their complexity.
Store size, technical comfort, and how often you need to repeat the task should decide which one you reach for first.
How do you prepare your data before bulk listing?
Most failed imports trace back to bad prep, not bad tools. Get the file right before you touch the import button.
- Keep identifiers intact. When updating existing products, preserve the Handle, product ID, Variant ID, and Variant SKU columns exactly as Shopify exported them. Change these and Shopify may create duplicates instead of updating the original.
- Sort out images properly. You can point to public image URLs or upload directly through Shopify Files. Multiple images per product are supported, and the order they appear in the CSV sets their display order on the product page.
- Save as CSV UTF-8. This avoids mangled characters in titles or descriptions, particularly with accented letters or currency symbols. Check that everything is comma-separated with no stray columns creeping in from a spreadsheet export.
- Handle metafields correctly. CSV import and export support product-level metafields, but not variant metafields — those need the variant bulk editor or the API instead.
- Run sanity checks. Deduplicate SKUs, validate that every handle is unique, and test with a small sample before uploading the full file.
Pro Tip: Open your CSV in a plain text editor, not just a spreadsheet app, before uploading. Spreadsheet software sometimes silently reformats numbers or strips leading zeros from SKUs, and you won’t notice until the import throws errors.
How do you import or update products with a Shopify CSV?
The process is the same whether you’re adding new products or refreshing existing ones. The difference lies entirely in whether you keep the identifier columns from your last export.
- Export a template first. Go to Products, select Export, and download a CSV of your current catalogue. This gives you the exact column structure Shopify expects.
- Map your supplier data to Shopify’s columns. Line up titles, prices, SKUs, and images against the template, keeping the Handle and Variant SKU columns untouched for anything you’re updating rather than creating.
- Run the import. In the admin, go to Products, then Import, then Add file. Choose whether new products publish to the online store or stay hidden, then confirm the run.
- Understand how Shopify matches rows. Updates are matched by Handle and Variant SKU. Where a match is found, existing values get overwritten by whatever’s in your file, so blank cells can wipe out data you meant to keep.
- Verify afterwards. Check the import log for failed rows, confirm images loaded correctly, and spot check a handful of products against your source data.
Remember: Shopify’s own documentation is explicit that imports cannot be cancelled once started, so a bad file runs its full course before you can fix anything.
When should you use the bulk editor instead of a CSV?
The bulk editor is the right tool when you’re adjusting a modest number of products and don’t want the overhead of exporting, editing, and re-importing a file. Select the products from your list, open the bulk editor, and add the columns you need: price, SKU, compare-at price, inventory, whatever’s relevant to that session. Changes save directly without a file round-trip.
It has real limits, though. Performance degrades once you’re editing a large table in the browser, and Shopify Community members have flagged practical constraints around viewing and editing more than fifty products per page, along with browser-specific quirks like URL-length issues in Microsoft Edge.
- Use bulk actions (not the editor) for publishing, unpublishing, tagging, archiving, or deleting products across a selection.
- Use saved searches and filters to group similar SKUs before editing, so you’re not hunting through the full catalogue each time.
- Prefer CSV over the bulk editor once you’re working with more than a page or two of products.
Pro Tip: Build saved filters around your supplier or product category. When a price change comes through from one supplier, you can select that entire group in two clicks instead of scrolling through your whole catalogue.
What is the GraphQL Admin API bulk operations workflow?
This is the route for developers automating catalogues that CSV and the bulk editor simply can’t handle efficiently, typically thousands of SKUs updated on a schedule.
- Prepare JSONL input. Each line represents one mutation, structured as newline-delimited JSON rather than a flat CSV.
- Upload via stagedUploadsCreate, then trigger the import with bulkOperationRunMutation.
- Poll for status and download the results file once Shopify finishes processing, which happens asynchronously so you’re not sitting on a blocking request.
- Handle partial failures gracefully. Configuring
allowPartialUpdateslets valid rows apply even when some lines in the batch fail, with the failures captured separately for review. - For variant-heavy catalogues, the productVariantsBulkUpdate mutation handles many variants on a single product more efficiently than repeated single calls.
This is worth the setup cost once you’re running scheduled syncs or managing a catalogue an in-house developer can maintain. For everyone else, it’s usually cheaper to hire a developer for the initial build or lean on an integration app than to learn the API from scratch.
How do you troubleshoot a failed bulk import?
Test first, always. Run your file against a Shopify development store with a small sample before touching your live catalogue. It costs nothing and catches most formatting problems before they reach real customers.
- Malformed headers are the single most common cause of failure, followed by broken image URLs, encoding mismatches, and identifier columns that don’t match your last export.
- CSV cannot bulk-delete products. If you need to remove a large batch, use bulk actions in the admin instead, which cover archiving and deletion across Products, Orders, and Customers.
- Read the result file carefully. Failed rows are usually flagged with a specific reason, correct those rows in isolation rather than re-running the whole file.
Community threads consistently point to browser and page-size constraints as a recurring friction point once catalogues pass roughly fifty products per view, which is worth knowing before you plan a large in-admin editing session.
How does Ecom-eye fit into a bulk listing workflow?
Bulk importing solves the mechanics of getting products onto Shopify. It does nothing about the bigger risk for dropshippers: duplicate content copied straight from AliExpress or a competitor’s listing, which tanks SEO rankings and invites Google Merchant disapprovals.
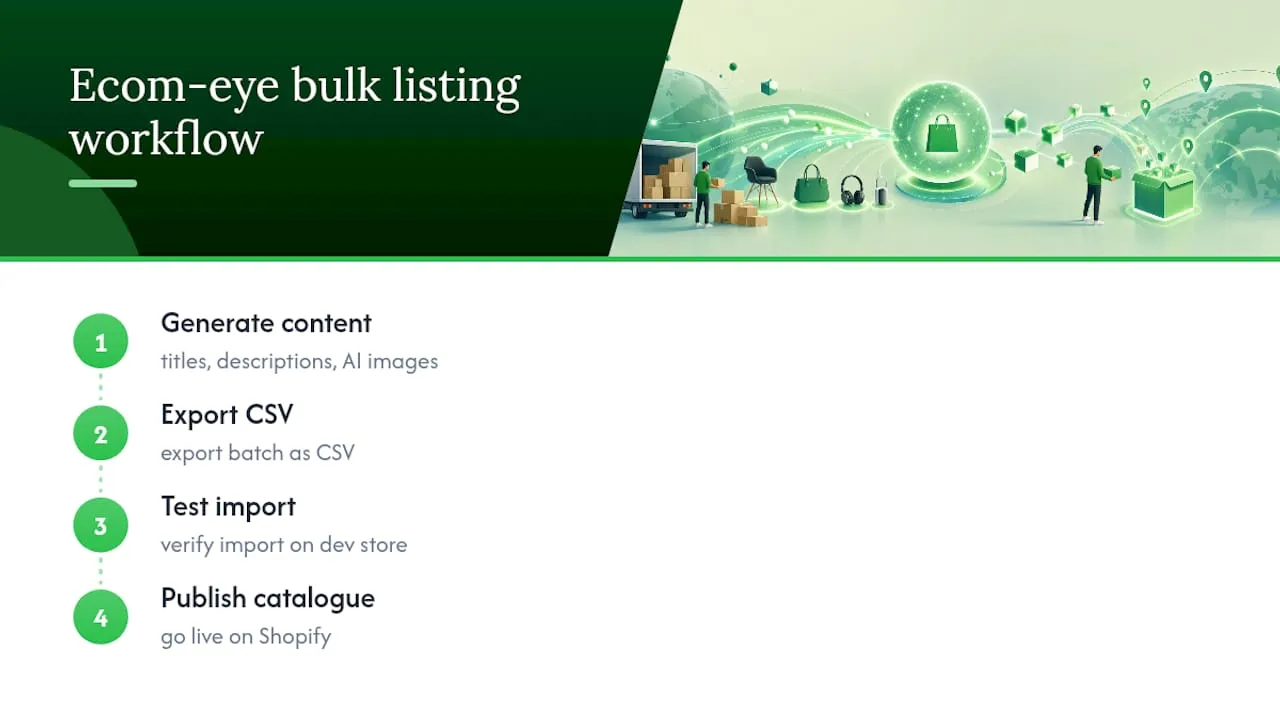
This kind of tool can generate unique titles, descriptions, and AI product images in bulk before that content ever touches a CSV. The practical workflow looks like this: generate unique content for your batch, export it as a CSV, test the import on a development store, then publish. Pairing content generation with the CSV import method covered above means the scaling bottleneck shifts from writing product pages to simply running the import.
What actually matters when you’re scaling a Shopify catalogue
Most advice on bulk listing treats the import as the hard part. It isn’t. Shopify’s own tools, CSV, the bulk editor, the API, are well documented and mechanically straightforward once you’ve done it twice. The real bottleneck for anyone running a dropshipping catalogue is content, not mechanics.
I’d argue the conventional advice gets the priority backwards. Guides spend paragraphs on column mapping and file encoding, then treat “write your product descriptions” as an afterthought. But a technically flawless CSV import full of copy-pasted AliExpress descriptions still gets you flagged for duplicate content and still tanks your organic rankings. The import worked. The catalogue didn’t.
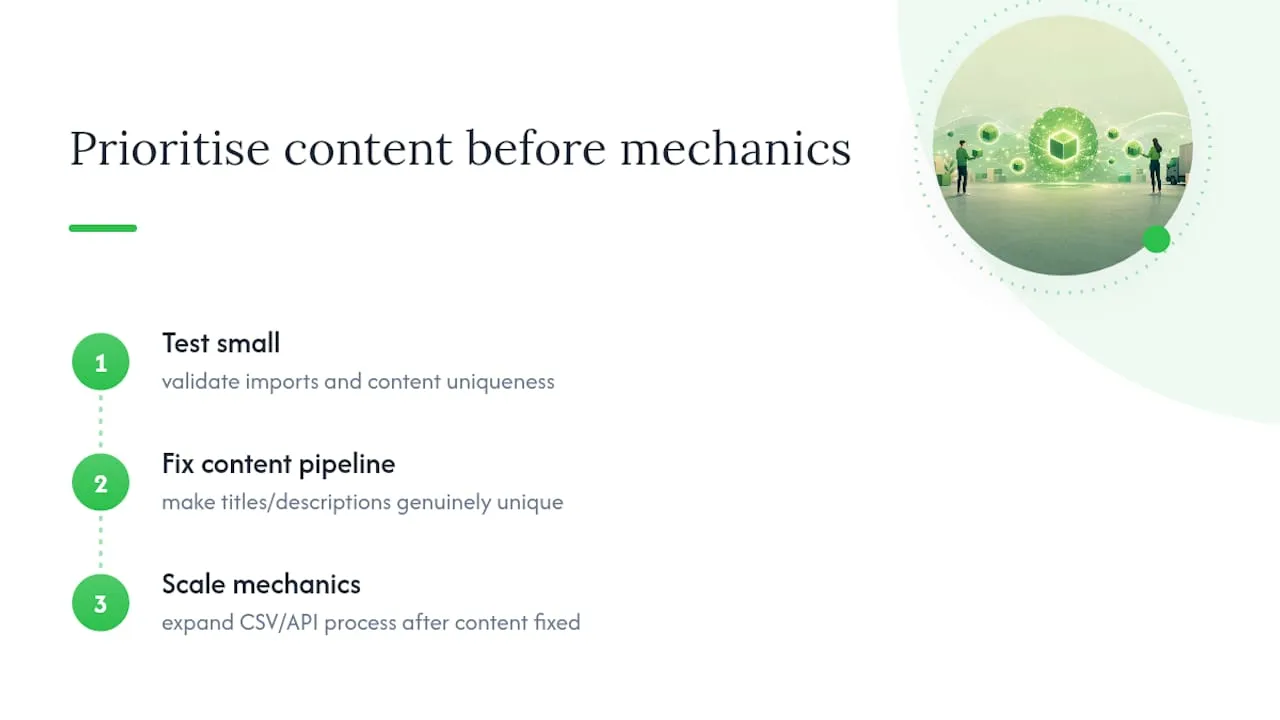
What should you prioritise first? Solve content uniqueness before you solve import mechanics. If your titles and descriptions are generated or rewritten to be genuinely unique, a slightly clunky CSV process is a minor inconvenience. If they’re not, the smoothest import in the world just publishes a liability faster. Test small, fix your content pipeline, then scale the mechanical side, in that order.
— Koen
Generate unique listings, then bulk export to Shopify
This kind of tool is an alternative to manually rewriting product pages one by one, or risking duplicate-content penalties by copying them straight from AliExpress or a competitor’s store. It can generate SEO-ready titles, clean descriptions, and AI product images in bulk, then export the whole batch to Shopify in one click with an automated publishing platform, no manual rewriting, no copyright exposure.
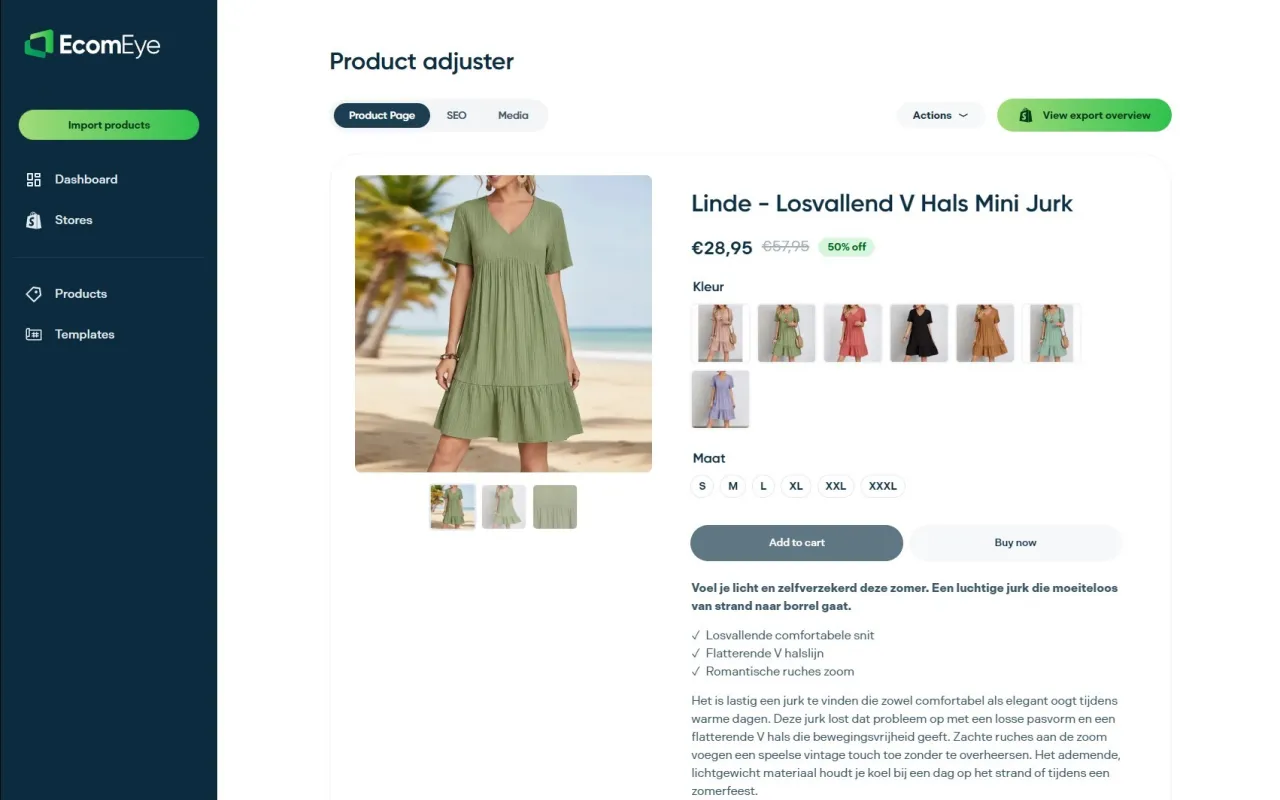
This suits dropshippers and multi-SKU stores pulling from supplier feeds who need genuinely unique content at the volume a CSV import demands, rather than a handful of hand-written pages. The AI product description generator handles the copy; the AI image generator replaces low-quality supplier photos with clean, original visuals ready for your CSV’s image URL column.
Generate a small sample batch, export it, and run it through a development store import before you commit your full catalogue. It’s the fastest way to see whether the workflow fits before scaling it up.
Key Shopify documentation and helpful reads
Start with the CSV import guide and bulk editing help for admin steps, the GraphQL bulk operations docs for developer workflows, and A guide on bulk product image generation for image prep.
Sources
FAQ
How can I list products in bulk on Shopify?
Use the CSV import for large batches, going to Products, then Import, then Add file, or the bulk editor for smaller ad-hoc edits selected directly from your product list.
How do I bulk edit more than fifty products in Shopify?
The bulk editor becomes slow and, per community reports, can hit browser display limits past roughly fifty items, so CSV export, edit, and re-import is the more reliable route for larger batches.
Can I bundle products on Shopify?
Product bundling is a separate feature from bulk listing, typically handled through Shopify’s bundle tools or a dedicated app, rather than through CSV import or the bulk editor covered here.
How can I bulk edit products in Shopify?
Select the products you want from your Products list, open the bulk editor, add the columns you need such as price or SKU, and save your changes directly in that table view.
Does Shopify’s CSV import support bulk deleting products?
No. CSV import cannot delete products in bulk; use bulk actions in the admin to archive or delete a selection instead.
Ready to boost your product pages?
Generate high-converting, SEO-optimized product pages in bulk using AI automation used by e-commerce experts.
No credit card required