How to create a Shopify store fast: beginner's guide
Learn how to quickly set up a Shopify store in under a day. Follow this beginner's guide for a sell-ready storefront in no time!

How to create a Shopify store fast: beginner’s guide

You can have a basic, sell-ready Shopify store live in under a day. The setup flow is genuinely straightforward: sign up, pick a design, add your products, configure payments and shipping, then remove the password and publish. That’s it. Here’s the exact sequence:
- Step 1: Create a Shopify account and choose a plan
- Step 2: Pick a theme or generate a storefront design with AI
- Step 3: Add products and build out your product pages
- Step 4: Set up payments, shipping zones and US tax settings
- Step 5: Connect a domain, remove the store password and start marketing
Most people overthink steps 2 and 3 and never launch. Don’t. A functional store with clear product pages beats a beautiful store that’s still in draft.
Key takeaways
A functional Shopify store with strong product pages, verified checkout and a live domain can be built and published in a single day by following the five-step sequence above.
| Point | Details |
|---|---|
| Launch fast, then improve | Go live when the store works; use real visitor data to refine pages rather than waiting for perfection. |
| Product pages before design | Clear CTA, mobile images, unique descriptions and social proof convert better than a polished theme. |
| Run a test order first | Use Shopify’s Bogus Gateway to verify checkout, tax, shipping and confirmation emails before publishing. |
| Remove the password to go live | The store stays private until you uncheck password protection in Online Store → Preferences. |
| Ecom-eye for bulk content | Ecom-eye generates unique, SEO-ready product pages and AI images in bulk and exports directly to Shopify. |
Table of Contents
- How do you create a Shopify account and choose the right plan?
- How do you choose a theme and set up your store design?
- How do you add products and build strong product pages?
- How do you set up payments, shipping and US taxes?
- How do you publish your store and start getting traffic?
- Which apps and AI tools are worth adding at launch?
- What product-page mistakes cost you the most sales?
- When should you hire a developer instead of doing it yourself?
- The honest case for launching before you’re ready
- Bulk product pages without the manual work
- Sources
- FAQ
How do you create a Shopify account and choose the right plan?
Go to Shopify’s signup page and enter your email. You’ll be walked through a short onboarding questionnaire, then dropped into the Shopify admin. No credit card is required to start.
Shopify’s current entry path is a three-day free trial, often followed by a promotional low-rate period for new stores. After that, paid plans kick in. The three plans most beginners consider are:
- Basic plan: one staff account, all core sales channels, Shopify Payments enabled. Sufficient for most new stores.
- Shopify plan: adds more staff accounts, better shipping discounts and lower transaction fees.
- Advanced plan: for stores with high volume or complex reporting needs.
The single biggest cost decision at the start is whether to use Shopify Payments (no extra transaction fee) or a third-party gateway like PayPal or Stripe (which adds an additional transaction fee depending on your plan). For US sellers, activating Shopify Payments from day one is almost always the right call.
Timeline to launch: a minimal store with five to ten products can go live in a few hours. What slows people down is writing product descriptions, sourcing images and deciding on a theme. Plan for a full day if you’re starting from scratch.
Quick note: Shopify’s website builder includes built-in AI features to generate store copy and images, which cuts that writing time considerably for beginners.
How do you choose a theme and set up your store design?
Shopify’s Theme Store has numerous options, split between free and paid. Paid themes typically involve a one-time purchase fee. For a first store, start with a free theme. Dawn is Shopify’s default and performs well on mobile out of the box.
The four design choices at this stage:
- Free theme (Dawn, Craft, Sense): zero cost, well-maintained, mobile-responsive.
- Paid theme: better built-in features (quick-buy, advanced filtering), worth it once you know your niche.
- Customised free theme: edit colours, fonts and layout sections in the Theme Editor without touching code.
- AI-generated storefront: Shopify’s AI tools can draft a homepage layout and copy based on your store type.
Before adding products in bulk, run through this quick customisation checklist:
- Upload your logo (Settings → Brand)
- Set brand colours in the Theme Editor
- Write a homepage hero headline and subheading
- Build a simple main menu (Home, Shop, Contact)
- Add a favicon
Pro Tip: Preview your theme on a real mobile device before committing. Add two or three test products, then browse the store on your phone. If the images look cramped or the “Add to Cart” button is hard to tap, switch themes now rather than after you’ve built out 50 product pages.
Mobile responsiveness isn’t optional. The majority of e-commerce traffic arrives on mobile, and a theme that looks fine on desktop can break badly on a 375px screen.
How do you add products and build strong product pages?
This is where most new stores lose sales before they’ve made any. A weak product page, not a weak theme, is what kills conversion. Follow this sequence for every product:
- Go to Products → Add product in the admin.
- Write a clear, specific product title (include the key descriptor: material, size, use case).
- Upload images: minimum three angles, recommended 2048 × 2048px, square crop. Add alt text to every image.
- Write a unique product description: never copy the manufacturer’s text. Duplicate content harms SEO and can trigger Google Merchant Centre disapprovals.
- Set price, compare-at price (for sale items) and cost per item.
- Add variants (size, colour) using the Variants section. Get this right before bulk importing — correcting variant structure after the fact can break inventory assignments and collection filters.
- Fill in inventory fields: SKU, barcode, track quantity toggle.
- Complete the SEO fields at the bottom of the product page: page title, meta description and URL handle.
- Save and set product status to Active.
For product images specifically, use a white or neutral background for the hero shot, show the product in use for secondary images and compress files to under 1MB without losing visible quality. Shopify serves images via a CDN, but oversized files still slow mobile load times.
Bulk imports: Shopify accepts CSV imports via the Products page. If you’re importing more than 20 products, map your CSV columns to Shopify’s template exactly before uploading. Variant columns (Option1 Name, Option1 Value) must be consistent across every row for the same product, or Shopify creates duplicate listings.
The product-page checklist that moves conversion most: prominent price, single clear CTA (“Add to Cart” above the fold), a one-line shipping summary, and at least a handful of customer reviews.
How do you set up payments, shipping and US taxes?
Getting checkout functional is non-negotiable before you publish. Work through these in order:
- Payments: Go to Settings → Payments. Click “Activate Shopify Payments” and complete identity verification. If you prefer a third-party provider, click “Choose third-party provider” and follow the setup wizard. Note: using a third-party provider on the Basic plan adds a 2% transaction fee per order.
- Shipping: Go to Settings → Shipping and delivery. Create a shipping zone for the United States. Add at least one rate: flat rate, carrier-calculated, or free shipping over a threshold. For most beginners, a flat shipping rate for domestic orders is a simple starting point.
- US taxes: Go to Settings → Taxes and duties. Shopify can automatically calculate US sales tax based on your nexus states. Add your home state as a nexus location. If you have nexus in additional states (due to sales volume or physical presence), add those too. This is a high-level starting point; consult a US tax professional for your specific situation.
- Legal pages: Go to Settings → Policies. Shopify provides template generators for your Privacy Policy, Terms of Service and Refund Policy. Fill in the blanks and save. These appear automatically in your store footer.
Test your checkout before going live. In Settings → Payments, enable the Bogus Gateway (or use Shopify’s built-in test mode). Place a test order end-to-end: add to cart, enter a test card number, complete checkout, then verify the order appears in your admin. Check that the confirmation email sends correctly and that shipping rates display as expected.
- Verify tax is calculating on the order total
- Confirm the correct shipping rate appears at checkout
- Check that the order confirmation email arrives and looks right
- Cancel and refund the test order afterwards
How do you publish your store and start getting traffic?
Your store is password-protected by default. Forgetting to remove that password is one of the most common launch-day mistakes. Go to Online Store → Preferences → Password protection and uncheck “Restrict access to visitors with the password.” Save. Your store is now public.
Domain setup: you have three options.
- Keep the myshopify.com subdomain: free, functional, but looks less professional.
- Buy a domain through Shopify: $14–$20/year for a .com, connected automatically.
- Connect an external domain (from GoDaddy, Namecheap, Google Domains, etc.): point the DNS records to Shopify’s servers. Takes 24–48 hours to propagate.
For most new stores, buying directly through Shopify is the fastest path. No DNS configuration needed.
Basic SEO at launch: go to Online Store → Preferences and fill in your homepage title (50–60 characters), meta description (150–160 characters) and social sharing image. Then go to each product page and confirm the SEO fields are filled. Search engines index Shopify stores quickly once the password is removed.
First marketing steps:
- Add your store to a sales channel (Facebook, Instagram, Google) via the Sales Channels menu in the admin.
- Connect Google Analytics 4 via Online Store → Preferences → Google Analytics.
- Post one piece of organic social content on the day you launch — even a simple “we’re live” post with a product photo drives early traffic.
Shopify’s expert blog on ecommerce visibility covers the next-level marketing steps once you have your first few orders.
Which apps and AI tools are worth adding at launch?
The Shopify App Store offers a large selection of apps. At launch, you need very few. Focus on categories that solve a real problem you have right now.
| App category | What it solves | When to add it |
|---|---|---|
| Product import / bulk editor | Speeds up adding many products from AliExpress or CSV | Before launch if you have 20+ products |
| AI copy and image generator | Creates unique descriptions and product images at scale | Before or at launch for bulk stores |
| Reviews and social proof | Adds customer reviews to product pages | At launch or immediately after first sales |
| Analytics and heatmaps | Shows where visitors drop off on product pages | After first 100 sessions |
| Email / SMS marketing | Captures leads and automates abandoned cart flows | Within first week of launch |
Shopify Sidekick is the built-in AI assistant inside the admin. It can draft product descriptions, write email copy and answer setup questions without leaving the dashboard. For beginners who don’t want to hire a copywriter, it’s a practical starting point.
For AI-assisted personalisation at a more advanced level, generative AI tools can tailor product recommendations and storefront content to individual visitors, which matters more once you have consistent traffic.
Pro Tip: If you plan to import products in bulk, set up your variant structure in a test CSV and import five products first. Verify that sizes, colours and SKUs appear correctly in the admin before running the full import. Fixing a broken bulk import is far slower than a five-product pilot.
What product-page mistakes cost you the most sales?
E-commerce experts are consistent on this: new store owners spend too long on theme aesthetics and too little time on product pages. The conversion gains from a clear CTA, mobile-friendly images and social proof outweigh almost any design upgrade.
The priority order for product-page fixes, based on impact:
- CTA clarity: “Add to Cart” should be visible without scrolling on mobile.
- Mobile image quality: images must load fast and fill the screen without cropping the product.
- Unique descriptions: never use manufacturer copy. Write at least two sentences that describe the product from the buyer’s perspective.
- Social proof: even three to five reviews on a product page lift conversion measurably.
- Shipping clarity: one line stating delivery time and cost, near the CTA.
For bulk creation workflows, the practical sequence is: set variant structure first, write or generate unique descriptions for each SKU, then import. Running a small pilot batch before bulk publishing lets you catch formatting errors before they affect 200 product pages at once.
Shopify’s own guidance frames launch as iterative: go live when the store is functional, then use real visitor data to refine pages. Waiting for a perfect store is the most expensive delay a new merchant makes.
Pro Tip: Use Shopify’s tutorial walkthrough as a live checklist during setup. It covers account creation through test order in sequence and flags the steps most beginners skip.
For deeper guidance on SEO-optimised product page structure, the metadata and URL conventions matter more than most beginners realise.
When should you hire a developer instead of doing it yourself?
Most new Shopify stores don’t need a developer. The platform is built for non-technical founders. But there are clear signals that DIY is costing you more time than a hire would cost in money:
- You need a custom checkout flow (multi-step, subscription logic, or B2B pricing rules).
- You’re integrating a third-party ERP, WMS or fulfilment API that doesn’t have a native Shopify app.
- You’re importing thousands of products with complex variant mappings that a CSV can’t handle cleanly.
- You need custom storefront code (Liquid or headless) beyond what the Theme Editor supports.
For US-based freelance Shopify developers, expect $75–$150/hour for general theme work and $100–$200/hour for API integrations. Fixed-scope projects (theme customisation, app integration) typically run $500–$3,000 depending on complexity. Posting on Upwork or the Shopify Experts marketplace with a clear brief, your product CSV sample and a list of required apps will get you accurate quotes faster than a vague “build me a store” request.
Decision checklist:
- Can you complete the task using Shopify’s admin UI or a well-reviewed app? → DIY.
- Does the task require code changes to theme files or API calls? → Consider a developer.
- Is the task blocking launch entirely? → Hire now. Is it a nice-to-have? → Launch first, hire later.
The honest case for launching before you’re ready
The most useful thing you can do for your store is publish it. Not when it’s perfect. When it works.
Real customer behaviour tells you things no amount of pre-launch planning can. Which product gets clicked first. Where people drop off. Which image stops the scroll. You cannot know any of that from a draft. The stores that iterate on live data consistently outperform the ones that spend three weeks adjusting font sizes in the Theme Editor.
Product-page basics beat fancy design for early sales. A clear price, a readable description, one good image and an obvious “Add to Cart” button will convert better than a beautifully animated homepage with weak product pages behind it. Get those fundamentals right first.
One practical reminder: when you remove the store password to go public, double-check that your payment provider is fully verified and your test order has been cancelled. Those two steps take five minutes and prevent the most common launch-day headaches.
Bulk product pages without the manual work
If you’re building a Shopify store with more than a handful of products, the most time-consuming part isn’t the setup. It’s writing unique, SEO-ready descriptions and sourcing quality images for every SKU.
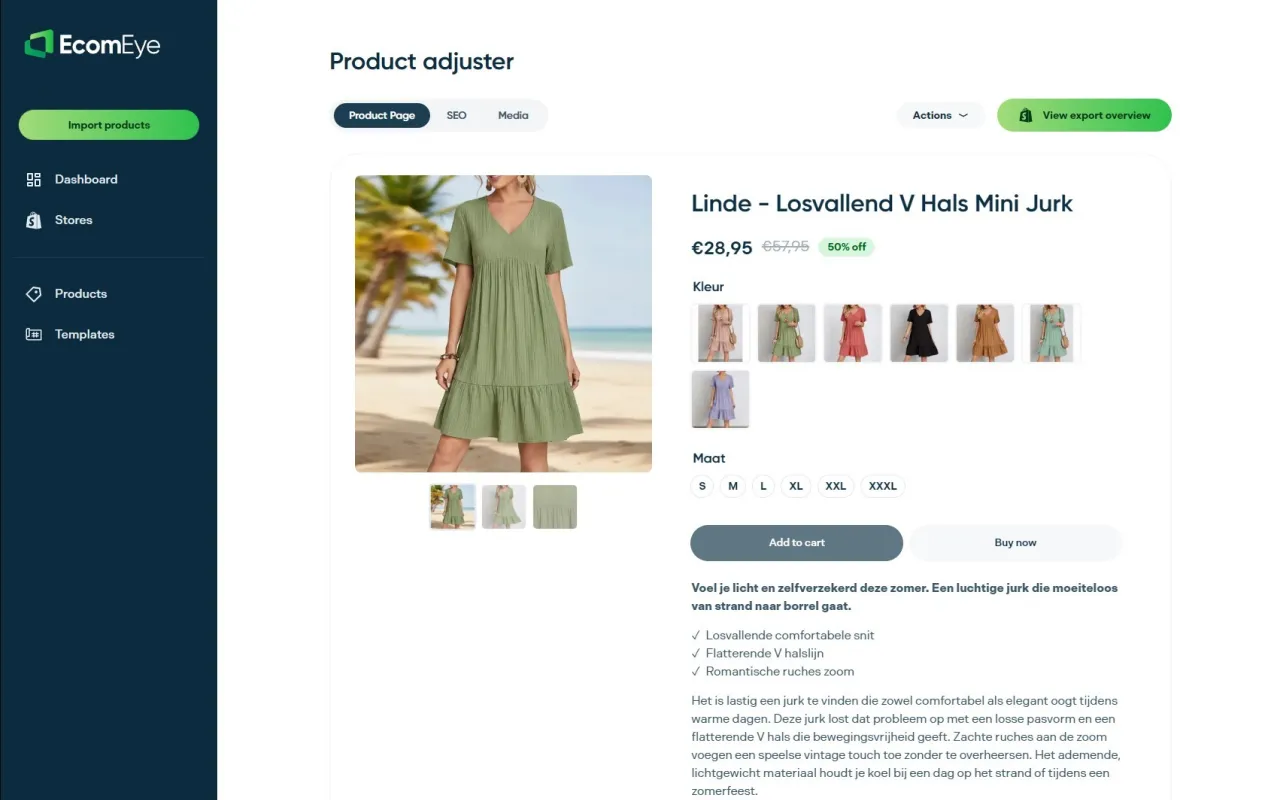
Ecom-eye is built specifically for that problem. Import products in bulk from AliExpress, Amazon, Temu or a competitor Shopify link, and Ecom-eye automatically generates unique titles, clean descriptions, SEO-ready content and high-quality AI product images for each one. No copied manufacturer text. No duplicate content risk. No manual rewriting.
Key benefits for store builders:
- Bulk generation: hundreds of product pages created in minutes, not days.
- One-click Shopify export: pages go directly into your store without reformatting.
- AI product images: generated from scratch, copyright-safe and optimised for product listings.
- Multi-language support: publish to multiple markets from a single import.
See what it produces with your own products at the AI product image generator — free to try for new users.
Sources
FAQ
Is it free to create a Shopify store?
Shopify offers a three-day free trial with no credit card required. After the trial, paid plans start at the Basic plan level, with promotional pricing sometimes available for new stores in the first few months.
Do I need an LLC to start a Shopify store?
No. You can sign up and start selling as a sole trader. Many US merchants form an LLC later for liability protection, but it is not a requirement to open a Shopify account or process payments.
How much does it cost to start a store on Shopify?
The minimum realistic cost includes the Basic plan plus a domain ($14–$20/year if purchased through Shopify).
Is Shopify still worth it in 2026?
Yes, for most new store owners. Shopify handles hosting, security, payments and sales-channel integrations in one place, which removes the technical overhead that kills early-stage stores. The main cost consideration is the monthly plan fee versus the time saved on infrastructure.
Can I duplicate a Shopify store or import products from another store?
You can import products using a CSV export from an existing store, or use a bulk import tool to pull product data from AliExpress, Amazon or a competitor Shopify URL. Always rewrite descriptions before publishing — copied product content harms SEO rankings and can trigger Google Merchant Centre disapprovals.
Ready to boost your product pages?
Generate high-converting, SEO-optimized product pages in bulk using AI automation used by e-commerce experts.
No credit card required