Shopify product page: practical guide for store owners
Discover how to optimize your Shopify product page for better conversions. Boost sales with essential strategies every store owner should know!

Shopify product page: practical guide for store owners

A Shopify product page (also called a product detail page or PDP) is the single page where a visitor decides whether to buy. Everything else in your store exists to get them there. What happens on that page determines whether they convert.
Before going any further, run this checklist on your highest-traffic product page right now:
- Title and price visible above the fold, with compare-at price showing savings where relevant
- Product media linked to specific variants so images swap on selection
- Persistent buy area with Add to Cart always visible, especially on mobile
- Variant selector using swatches or buttons, not long dropdowns
- Shipping and returns summarised near the buy button, not buried in the footer
- Review summary (star rating + count) placed next to the title or price
- Concise value props (three to four bullet points) between the title and the description
- SEO fields completed: page title, meta description, image alt text, and URL handle
High-performing stores prioritise persistent Add-to-Cart buttons, images linked to variants, social proof near the buy button, and transparent shipping and return policies. When testing, they focus on one primary metric at a time.
Key takeaways
A well-structured Shopify product page with unique copy, linked variant images, a persistent buy button, and completed SEO fields is the single highest-leverage asset in any Shopify store.
| Point | Details |
|---|---|
| Checklist first | Audit title, media, buy area, variant selectors, reviews, and SEO fields on your highest-traffic page today. |
| Unique copy is non-negotiable | Copied supplier descriptions cause duplicate content flags and Merchant Centre disapprovals — rewrite every page. |
| Weekly audits compound | Treat PDPs as a living laboratory; audit weekly and test one metric at a time with guardrails on AOV and return rate. |
| Media explains, not decorates | Use five to eight images per product with distinct purposes; video and 3D reduce returns on high-ticket items. |
| Ecom-eye for scale | Ecom-eye generates unique, SEO-ready titles, descriptions, and AI images in bulk and exports directly to Shopify in one click. |
Table of Contents
- What every Shopify product page field actually does
- How to create, duplicate, edit, and preview a product in Shopify admin
- What your product form and buy box must get right
- Design and conversion best practices with real Shopify examples
- Shopify product page SEO: titles, meta descriptions, alt text, and structured data
- How to organise products with types, tags, collections, and recommendations
- Scaling product pages: audits, test cadence, and bulk-generation workflow
- Common product-page problems and practical fixes
- Product pages are your highest-leverage growth channel
- Publish unique, SEO-ready product pages at scale with Ecom-eye
- Sources
- FAQ
What every Shopify product page field actually does
Understanding the admin fields is where most store owners lose time. Here is what each one controls and what value to put in it.
Title and description
Your title does two jobs: it tells Google what the page is about, and it tells the shopper they are in the right place. Lead with the product name, then add the key differentiator (material, size, use case). Keep it under 70 characters so it does not truncate in search results. For optimising product page titles for SEO and conversions, the pattern “Product Name + Key Attribute + Brand” consistently outperforms generic titles.
The description field supports rich text. Use the first paragraph as a short benefit-led summary (two to three sentences) that a skimmer can read in under ten seconds. Follow it with a longer section covering specs, materials, and use cases. The summary appears in some theme layouts above the fold; the longer section sits below.
Price fields and selling plans
| Field | What it does | Best practice |
|---|---|---|
| Price | The selling price displayed to shoppers | Set accurately; never leave at zero |
| Compare-at price | Crossed-out “was” price | Only use when there is a genuine prior price |
| Cost per item | Internal margin tracking | Not shown to shoppers |
| Selling plans | Subscriptions and pay-later options | Use for consumables or repeat-purchase products |
Product media
Aim for five to eight images per product with distinct purposes: hero shot on a clean background, lifestyle image in context, scale reference, close-up of key detail, and variant-specific images. Video and 3D imagery reduce returns by answering tactile questions visually — particularly for apparel, furniture, and accessories. Link each image to its corresponding variant in the media panel so the gallery updates when a shopper selects a colour or size.

Inventory and SKU
The SKU field is your internal reference; the barcode field accepts GTINs and EAN codes. GS1 barcodes are the authoritative standard for product identification and are required for Google Shopping and most marketplace feeds. Set your inventory policy to “Track quantity” for physical goods and configure low-stock thresholds so availability messaging (“Only 3 left”) triggers automatically.
Variants and options
Shopify represents product variations as options (Size, Colour) with values (S/M/L, Red/Blue). The theme renders these as selectors. Accessibility matters here: ensure each option has a visible label, not just a colour swatch with no text fallback. Shopify’s default behaviour selects the first available variant on page load.
Shipping settings
Weight, dimensions, and shipping profile assignment live in the product admin. Shopify uses weight to calculate shipping rates at checkout. Assign products to the correct shipping profile so the right rates apply. Display a one-line shipping summary near the buy button — “Free delivery over £50, dispatched in 1–2 days” — rather than making shoppers hunt for it.
Metafields and custom data
Shopify admin includes metafields for custom data, letting merchants display specialised attributes on a theme without custom development. Create a metafield definition in Settings > Custom data, assign it to the product, then expose it in your theme via the template editor. Common uses: wash-care instructions, compatibility notes, certifications, or ingredient lists.
Pro Tip: Set up metafield definitions once as a template, then bulk-fill them across your product catalogue. This keeps attribute data consistent and makes it easy to surface in filters or comparison tables later.
How to create, duplicate, edit, and preview a product in Shopify admin
-
Create a product. Go to Products > Add product. Fill in the title, description, and at least one image before saving. Set the status to “Draft” until the page is ready. Add variants under the Variants section, then link images to each variant in the media panel.
-
Set required fields to publish. A product needs a title, at least one image, a price, and an assigned sales channel to go live. Missing any of these keeps it in draft or makes it invisible in your storefront.
-
Duplicate for similar SKUs. Use the Duplicate button on any product page to copy all fields. Change the title, description, and images immediately — manufacturer descriptions cause duplicate content problems for resellers and dropshippers, so never leave the copied description unchanged.
-
Bulk-edit fields. From the Products list, tick multiple products and select Edit products. The bulk editor lets you update prices, inventory, tags, and metafields across many SKUs at once without opening each product individually.
-
Preview on desktop and mobile. From the product page in admin, click the eye icon or go to Online Store > Themes > Customise, then use the device toggle (desktop/mobile) to check layout. Pay attention to whether the buy button is visible without scrolling on a 375px-wide screen.
-
Publish and set availability. Change status from Draft to Active, then confirm the product is assigned to your Online Store sales channel and any relevant markets. Use the “Schedule availability” option to publish at a specific time for product launches.
-
Document with screenshots. Before making layout changes, screenshot the current admin panels (media, variants, metafields). This creates a reference point for rollbacks and makes handoffs to developers or VAs faster.
What your product form and buy box must get right
The product form is the functional core of any product page. It is where variant selection, quantity input, and purchase actions live. Get it wrong and shoppers leave without buying, even if everything else on the page is excellent.
UX rules for variant selection
Avoid long dropdowns on mobile. When a product has more than four or five options, a dropdown forces shoppers to tap, scroll, and tap again — each extra interaction is a drop-off risk. Swatches and button selectors are faster to scan and easier to tap. If your theme only supports dropdowns, a theme section override or a lightweight app can replace them.
The single biggest conversion leak on mobile product pages is variant selection friction. A shopper who cannot quickly find their size or colour will not wait — they will leave. Swatches, clear labels, and a “notify me when available” fallback for out-of-stock options together reduce that friction significantly.
Persistent buy bar
A sticky buy bar keeps the Add to Cart button visible as the shopper scrolls through images, descriptions, and reviews. Most modern Shopify themes include this as a toggle in the theme editor. If yours does not, it is worth adding — common fixes that move the needle fast include a sticky Add-to-Cart on mobile, and most changes show measurable impact within 7–14 days on pages with adequate traffic.
Accelerated checkout buttons
Shop Pay, PayPal, and Apple Pay buttons appear below Add to Cart when enabled. These let returning customers skip the cart and checkout in one tap. Enable them in Settings > Payments.
Developer notes
For custom storefronts, use selectedOrFirstAvailableVariant from the Storefront API to determine the default variant on page load. This field respects availability and prevents the page from defaulting to a sold-out option, which confuses shoppers and inflates “add to cart” failures.
Pro Tip: In Liquid, wrap your product form in {% form 'product', product %} and use product.selected_or_first_available_variant to set the initial state. This keeps variant selection consistent across theme and headless implementations.
Design and conversion best practices with real Shopify examples
The order in which information appears on a product page matters as much as the information itself. A high-converting product page follows a specific sequence: above-the-fold essentials and primary CTA, short value propositions, benefits, details and specs, proof, risk reversal, and FAQ. Shoppers do not read linearly — they scan, then commit to reading only when something catches their attention.
The answer stack
Structure your page in this order:
- Hero image + title + price + variant selector + Add to Cart
- Three to four value props (icons + one-line benefits)
- Product benefits in short paragraphs
- Specs and technical details (collapsible section works well here)
- Star rating summary + two or three testimonial snippets
- Guarantee, returns policy, or trust badge
- FAQ (four to six questions covering common objections)
This sequence reduces hesitation at each stage. A shopper who reaches the FAQ has already seen the proof and the risk reversal — they are close to buying.
Product media strategy
Images should aim for five to eight shots per product with distinct purposes: hero on a clean background, lifestyle in context, scale reference, close-up of texture or detail, and per-variant images. Video answers questions that images cannot — how a bag closes, how a garment moves, how a product assembles. 3D and AR are worth the investment for high-ticket items where returns are costly.

Product media should explain, not just decorate. Every image should answer a specific buyer question.
Proof and trust placement
Star rating summary belongs next to the title or price, not at the bottom of the page. A shopper who sees “4.8 (312 reviews)” before they read the description is already more likely to continue. Pull two or three short testimonial snippets into the above-fold area rather than relying on a full review section that requires scrolling.
CTA design
| Element | Weak version | Strong version |
|---|---|---|
| Button copy | “Submit” or “Buy” | “Add to Cart” or “Get yours today” |
| Button colour | Same as theme accent | High-contrast, distinct from other buttons |
| Button size | Small, easy to miss on mobile | Full-width on mobile, prominent on desktop |
| Placement | Below the fold | Visible without scrolling on all devices |
Before/after: common faults and quick fixes
Fault: Description is a wall of text copied from the supplier. Fix: Rewrite as a short benefit summary + scannable bullet specs. Add-to-cart rates typically improve within two weeks on pages with enough traffic.
Fault: No social proof above the fold. Fix: Add a star rating widget next to the title. Most review apps (Judge.me, Loox, Yotpo) support this placement with a single theme block.
Fault: Variant images do not swap on selection. Fix: Link each image to its variant in the media panel. If the theme does not support this natively, check the theme’s variant image mapping settings or use a variant image app.
For a deeper look at conversion-focused page structure for Shopify stores, the principles above apply whether you are running one SKU or a thousand.
Shopify product page SEO: titles, meta descriptions, alt text, and structured data
SEO fields on a Shopify product page live in two places: the on-page content (title, description, media) and the Search engine listing section at the bottom of the product admin. Both matter, and they serve different audiences.
Search engine listing fields
The page title in the SEO section is what appears in Google search results — it is separate from the on-page product title. Write it as: Primary keyword + product name + brand, keeping it under 60 characters. The meta description (under 160 characters) should read like a short ad: lead with the benefit, include a call to action, and mention a key differentiator.
The URL handle defaults to the product title. Shorten it to the core keyword phrase: /products/mens-leather-wallet rather than /products/mens-slim-bifold-leather-wallet-brown-2026.
Pro Tip: Write the on-page title for buyers (“The Slim Leather Wallet That Fits Any Pocket”) and the SEO page title for search (“Men’s Slim Leather Wallet | Brand Name”). They serve different jobs — do not make one do both.
Image alt text
Every product image needs descriptive alt text. Not “image1.jpg” and not a keyword-stuffed string — a plain description of what the image shows: “Black leather bifold wallet open to show card slots.” Alt text serves screen readers and image search equally.
Structured data and merchant feeds
Shopify automatically generates basic product schema (name, price, availability, image) for product pages. For dropshippers and resellers, the more pressing concern is Google Merchant Centre. Unique titles and descriptions are the single most effective way to avoid Merchant Centre disapprovals — copied supplier content triggers duplicate content flags that pull listings from Shopping results. Merchants should craft unique titles and descriptions using customer vocabulary rather than raw supplier documentation.
For boosting ecommerce visibility through Shopify SEO strategies, structured data and clean URL handles are the two technical levers most store owners overlook.
How to organise products with types, tags, collections, and recommendations
Good product organisation makes your store easier to navigate, easier to merchandise, and easier to maintain as the catalogue grows.
Product type is a free-text field used for filtering and reporting. Keep it consistent: “T-Shirt” not “t-shirt”, “Tshirt”, and “T Shirts” across different products. Inconsistent product types break automated collection rules and make analytics harder to read.
Vendor maps to the brand or supplier name. Shopify creates automatic vendor pages, so consistent naming matters here too.
Tags are the most flexible taxonomy tool. Use them for:
- Automated collection rules (“tag contains ‘summer-2026’”)
- Internal search filtering
- App integrations (review apps, loyalty programmes, upsell tools)
- Promotional logic (discount codes that apply to tagged products)
Collections come in two types. Automated collections use tag, product type, or vendor rules to add products dynamically — useful for “New Arrivals” or “Sale” collections. Manual collections give you full control over order and inclusion, better for curated ranges or featured edits.
Product recommendations on the PDP surface related products. Shopify’s recommendation API uses purchase history and product relationships by default. You can override this with manual recommendations or an app. Place recommendations below the fold, after the proof section — surfacing them too early distracts shoppers before they have decided to buy.
For subscriptions and bundles, selling plans and product bundles require either a Shopify app or custom development. Keep bundle SKUs distinct from individual product SKUs to avoid inventory and reporting confusion.
Consistent naming conventions and tag hygiene pay dividends at scale. A catalogue of 500 products with inconsistent tags is genuinely difficult to merchandise; the same catalogue with clean taxonomy takes minutes to reorganise.
Scaling product pages: audits, test cadence, and bulk-generation workflow
One well-optimised product page is a win. A hundred consistently optimised pages is a growth system.
Audit cadence and metrics
High-performing stores audit product pages weekly, treat PDPs as a living laboratory, and use analytics to find specific funnel leaks such as mobile variant selector drop-offs. Weekly is not excessive — it is the cadence that catches problems before they compound. The primary KPI per test should be conversion rate or add-to-cart rate, with guardrails on average order value and return rate to catch unintended side effects.
Prioritisation framework
Not all product pages deserve equal attention. Prioritise using a simple impact × traffic model: pages with high traffic and low conversion rate are your highest-leverage targets.
Bulk-generation workflow
| Stage | Task | Tool or method |
|---|---|---|
| Import | Pull product data from AliExpress, Amazon, or supplier links | Bulk import tool or CSV |
| Generate | Create unique titles, descriptions, and images per SKU | AI generation pipeline |
| Template | Apply SEO patterns and metafield mappings consistently | Centralised template |
| Review | Spot-check a sample for accuracy and brand fit | Manual QA pass |
| Export | Push to Shopify in one click | Direct Shopify integration |
Treat bulk generation as content engineering, not one-off copywriting. Centralise your SEO patterns, metafield mappings, and image naming conventions so every generated page is unique and consistent. This is the approach that keeps content compliant with Google’s duplicate content guidelines at scale.
Pro Tip: When running tests at scale, never run two experiments on the same page simultaneously. Overlapping tests corrupt your data and make it impossible to attribute results to a single change. Roll out winners sequentially, not in parallel.
Testing at scale
Sample size matters. A page needs enough traffic to reach statistical significance before you call a winner — as a rough guide, aim for at least 100 conversions per variant before drawing conclusions. Roll out winners to similar pages in batches rather than all at once, so you have a control group if something goes wrong.
Common product-page problems and practical fixes
-
Add to Cart button disappears on mobile. The button is falling below the visible viewport, often because a large image or description pushes it down. Fix: enable the sticky buy bar in your theme settings (most themes have this as a toggle under the product section). If your theme lacks it, add a sticky bar via a lightweight app or a small theme code edit.
-
Variant images not swapping on selection. The images are not linked to their variants in the media panel. Fix: open the product in admin, go to the media section, hover over each image, and use the “Assign to variant” option to map it. If images are linked but still not swapping, check the theme’s variant image settings — some themes require a specific naming convention or a separate variant image section.
-
Slow product pages. Large uncompressed images are the most common cause. Fix: compress all images to under 200KB using a tool like TinyPNG or Shopify’s built-in compression, enable lazy loading for offscreen media, and audit installed apps — each app that loads scripts on the product page adds to load time. Remove any app you are not actively using. For a detailed look at optimising listing speed for your Shopify store, the image pipeline is the first place to start.
-
Duplicate content from supplier descriptions. Copied descriptions trigger Google duplicate content flags and Merchant Centre disapprovals. Fix: rewrite every description using customer vocabulary — what problem does the product solve, who is it for, what makes it different. Even a 200-word rewrite that leads with benefits and ends with specs outperforms a 600-word supplier data sheet.
-
Reviews not showing near the buy button. Most review apps default to placing the review section at the bottom of the page. Fix: use the theme editor to add a star rating summary block (available in Judge.me, Loox, and Yotpo) directly under the product title. This single change consistently lifts engagement with the review section and improves trust before the shopper reaches the buy button.
Product pages are your highest-leverage growth channel
Most store owners treat product pages as a publishing task: fill in the fields, upload the images, go live. The stores that grow consistently treat them differently. They treat each PDP as a testable, measurable asset with a specific job to do.
The evidence for this is straightforward. No ad spend required. No new products needed. The same visitors, a better page, twice the output. That arithmetic holds whether you have ten products or ten thousand.
What I find underestimated is the compounding effect of systematic optimisation at scale. Fixing one page is useful. Building a process that generates unique, SEO-ready pages consistently, audits them weekly, and tests one change at a time — that is what separates stores that plateau from stores that grow quarter after quarter. The methodology is not complicated. The discipline to apply it across every SKU is where most stores fall short.
For dropshippers specifically, the duplicate content problem is not a minor SEO nuisance. It is the reason Google Shopping campaigns underperform, why Merchant Centre disapprovals pile up, and why organic traffic never builds. Unique pages are not a nice extra — they are the baseline for any store that wants sustainable traffic.
Publish unique, SEO-ready product pages at scale with Ecom-eye
Rewriting hundreds of product descriptions manually is the bottleneck that stops most Shopify stores from scaling. Ecom-eye removes it entirely.
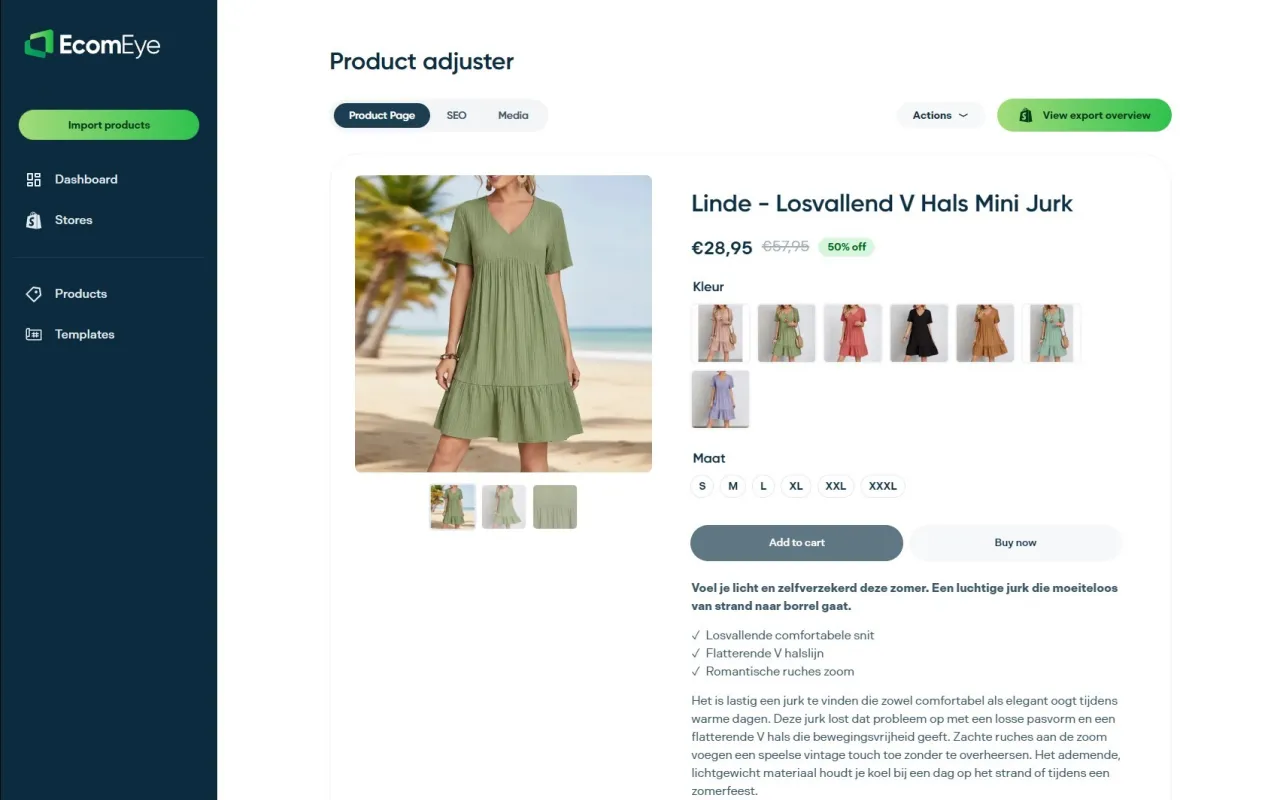
Import products in bulk from AliExpress, Amazon, Temu, or any competitor Shopify link. Ecom-eye automatically generates unique titles, benefit-led descriptions, SEO-ready content, and high-quality AI product images for every SKU — no rewriting, no copyright risk, no manual work. Multi-language pages, built-in templates, and size system conversion are included. When your pages are ready, export directly to Shopify in one click.
For stores publishing at volume, the AI product description generator handles the content pipeline that would otherwise take days per batch. If product imagery is the bottleneck, the AI product image generator produces clean, commercial-quality images without a photoshoot.
Start a free trial at Ecom-eye and publish your first batch of unique, Google-compliant product pages today.
Sources
FAQ
How do you create a product page on Shopify?
Go to Products > Add product in your Shopify admin, fill in the title, description, price, and media, then set the status to Active and assign it to your Online Store sales channel. The page goes live immediately once published.
What fields matter most for a converting Shopify product page?
Title, hero image linked to variants, price with compare-at where relevant, a visible Add to Cart button, and a star rating summary near the buy area are the highest-impact fields. Shipping information displayed near the price also reduces checkout abandonment.
How much does Shopify take from a sale?
Check Shopify’s current pricing page for the latest rates, as these figures can change.
Does duplicate content hurt Shopify product pages?
Yes. Copied supplier descriptions trigger Google duplicate content flags and cause Google Merchant Centre disapprovals that pull your products from Shopping results. Rewriting titles and descriptions in customer language is the fix — and the most direct way to improve both organic rankings and paid feed performance.
Do I need an LLC to run a Shopify store?
No legal requirement exists to form an LLC before opening a Shopify store, but operating as a registered business entity can limit personal liability and simplify tax reporting. Consult a qualified legal or financial professional for advice specific to your situation and jurisdiction.
Ready to boost your product pages?
Generate high-converting, SEO-optimized product pages in bulk using AI automation used by e-commerce experts.
No credit card required