Shopify Product Image Compression: A Practical Guide
How Shopify compresses product images, which sizes and formats to upload, how to compress in bulk and how to check that photos stay sharp on every device.

Shopify Product Image Compression: A Practical Guide

Shopify does not compress what you upload to the admin, but it can compress the versions your theme serves to shoppers. So the work that is yours to do is upload the right file: correct dimensions, a sensible format and a small enough weight. Do that once, consistently, across the whole catalogue, and you rarely need to fight the platform. The harder part is doing it for hundreds of listings, which is why we build product images and pages in bulk rather than one at a time.
TL;DR
- Shopify says images are not compressed when uploaded to the admin, but images served through a theme might be, and it delivers WebP or AVIF to browsers that support them.
- Upload at 2048 x 2048 px for square product images, in JPEG for photos and PNG for graphics or transparency. Keep the original untouched.
- Aim for final web images around 200 KB or less, and check compressed files for blotchy detail at the size shoppers see.
- Blurry photos are usually a sizing problem (small source, undersized theme request, high-DPI screens), not only compression.
- For a catalogue, standardise size, format and aspect ratio at the creation stage, then test one batch before you apply anything to everything.
Table of Contents
- What Shopify actually does to your images
- The numbers to upload to: size, format and weight
- Why smaller images help speed and search
- How to compress product images before upload
- Compressing a whole catalogue in bulk
- Why product photos look blurry after upload
- Checking that images stay sharp everywhere
- Where our approach differs
- Perspective
- Build the catalogue once, with images that are ready
- FAQ
- Sources
What Shopify actually does to your images
Most store owners assume Shopify squeezes their photos on upload. According to the Shopify Help Center, images are not compressed when uploaded to the admin, but images served through a store theme might be. Shopify also picks a suitable format for delivery: WebP or AVIF go to browsers that support them, and GIFs are converted to animated WebP. You do not need to convert files manually for that.
Two practical consequences follow.
- You cannot switch the delivery compression off. Questions on the Shopify community about disabling it keep coming back, and the usable answer is to control what you feed it: a properly sized, clean source file gives the delivery layer less to damage.
- Uploading a huge file does not make the page lighter. Shopify creates different sizes automatically for different areas of the theme, but a bloated original still costs you time in your workflow and, in the wrong theme setting, in the browser.
The numbers to upload to: size, format and weight
Dimensions
Shopify’s product media guidance says product and collection images can go up to 5000 x 5000 px or 25 megapixels, with a file size under 20 MB. For square product images, it says 2048 x 2048 px usually displays best. That is the figure most merchants standardise on: big enough for zoom and retina screens, small enough to stay manageable.
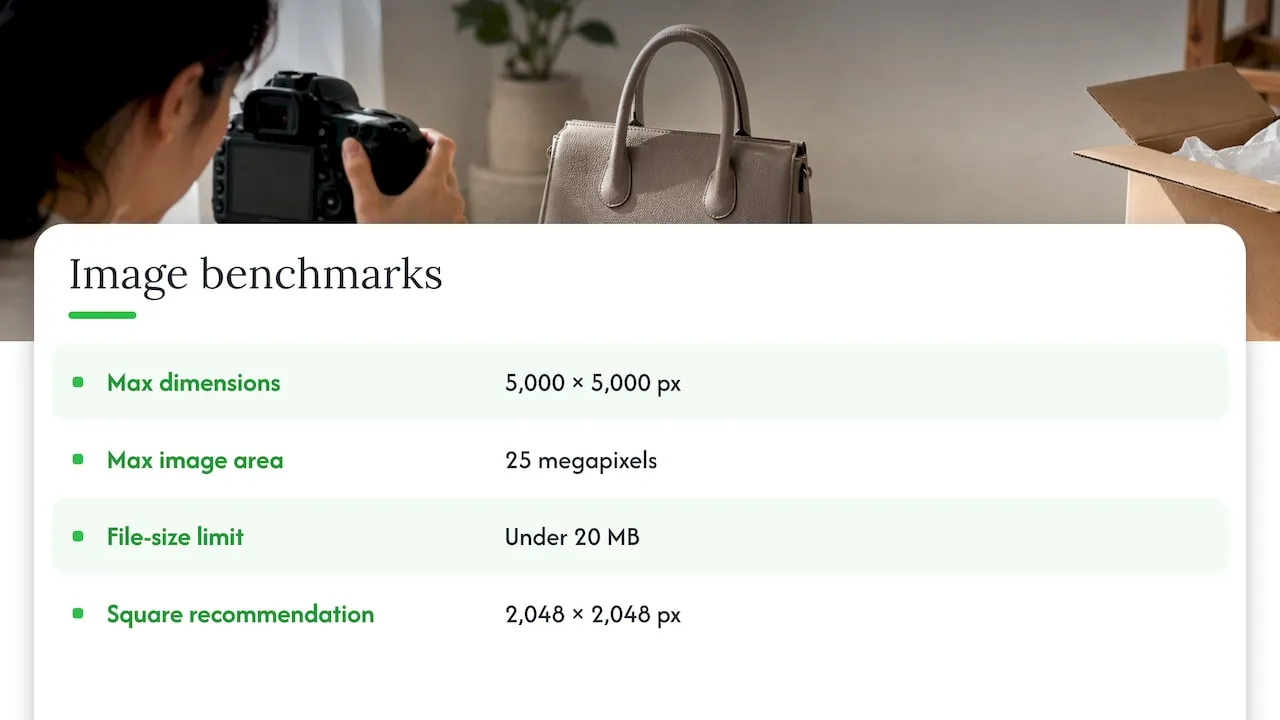
Keep one aspect ratio across the catalogue. Shopify notes that images shown side by side on collection pages display at different sizes unless they share a consistent ratio, so a mix of square, portrait and landscape files produces a ragged grid no matter how well you compress them. If you want a deeper walk-through, our guide to 2048×2048 px Shopify product images covers scaling without manual edits.
File formats
Shopify’s uploading images page lists JPEG, progressive JPEG, PNG, GIF, HEIC and WebP as supported. TIFF and BMP are accepted but converted to JPEG or PNG. Shopify’s own image optimization article describes JPEG as lossy and suited to product photos, PNG as lossless with transparency, and WebP and AVIF as formats that can be lossy or lossless.
A simple rule that works for most stores:
| Image type | Format to upload | Why |
|---|---|---|
| Studio or lifestyle photo | JPEG | Small files, good detail on photographs |
| Cut-out with transparent background | PNG | Lossless, keeps clean edges |
| Line art, text, logos | PNG | Crisp flat colour, no blocky artefacts |
| Animated product demo | GIF or animated WebP | Shopify converts GIFs to animated WebP on delivery |
If you want more background on matching format to image content, this explainer on choosing the right image format is worth a read.
File weight
Shopify’s image optimization article recommends keeping final web images at 200 KB or smaller and inspecting compressed files for blotchy detail. Treat 200 KB as a target for the typical gallery image, not a law: a detailed hero shot of a textured fabric may need a little more, a flat-colour accessory a lot less.
Why smaller images help speed and search
Smaller files mean less data for the browser to download. Shopify’s image guidance ties this to Largest Contentful Paint (LCP), the Core Web Vital that measures when the biggest visible element renders, and on a product page that is very often the main photo. A commonly cited threshold for a good LCP is under 2.5 seconds.
Shopify’s WebP article adds that smaller WebP files reduce bandwidth and loading time, which helps mobile usability and SEO. Image SEO has more to it than weight, too: descriptive filenames, alt text and image sitemaps help search engines find and understand your pictures. We cover that side in Shopify product images SEO, and this general guide to optimizing images for website performance gives wider context.
One trap: lazy loading changes when an image is requested, not how big it is, and the main product image should not be lazy loaded when it is the LCP element. Compress first, then leave the hero image alone.
How to compress product images before upload
The aim is the smallest file that still looks identical at the size a shopper sees. Here is the routine, with where it tends to go wrong.
- Keep the untouched original. Every later step starts from it. Once you overwrite the master, you cannot go back to a higher-quality version for a new theme or a bigger zoom.
- Resize to the largest size you will actually display. For square product shots that is 2048 x 2048 px. Resize only when the source is bigger, keep the aspect ratio and never upscale: a small file stretched larger is blurry whatever format you save it in.
- Choose the format by content. JPEG for photographs, PNG for transparency and flat graphics, as in the table above.
- Lower quality in steps. Export at a moderate quality, view at 100 percent, then drop it a notch and compare. Stop when you see banding in gradients, mushy texture or fuzzy small print on packaging.
- Avoid recompressing a lossy file. Shopify’s WebP article warns that repeatedly saving or editing a lossy WebP can accumulate blur, blockiness and colour distortion. Always export from the original, not from the last export.
- Test one before the batch. Run a single representative image through the whole pipeline, upload it, and view it on the live product page before you process the rest.
The pain point for dropshippers is step 1. Supplier images often arrive as small, already-compressed JPEGs, sometimes with watermarks, in inconsistent ratios. You cannot recover detail that was thrown away before the file reached you, and you cannot lawfully count on reusing a competitor’s photos either. Starting from fresh, consistently sized images is the cleaner route, which is where bulk generation comes in (more on that below).
Compressing a whole catalogue in bulk
Compressing ten images by hand is fine. Compressing 2,000 is a project, and a mistake repeats 2,000 times. A safe approach:
- Fix the source, not just the symptom. If new products always enter at the same dimensions, format and ratio, you never need a rescue job on the whole library.
- Sample before you commit. Pick 20 to 50 products from different suppliers and categories, because each source has its own quirks: transparent PNGs, odd ratios, tiny originals.
- Measure before and after. Run a PageSpeed Insights check on a few representative product and collection pages first, then again after the change. It flags images served larger than displayed, lightly compressed files and older formats.
- Validate image URLs before a CSV import. If you update images through a product CSV, every URL must load without login, redirects, expired tokens or an HTML landing page in its place. Test a small CSV first.
- Keep a rollback. The untouched originals are your undo button.
Our own guides on scalable product uploads and CSV bulk product image generation cover the catalogue side of this in more depth.
Why product photos look blurry after upload
Before you blame compression, check the usual suspects. A blurry photo is most often one of these:
| Cause | What you see | Fix |
|---|---|---|
| Low-resolution source | Soft even in the admin preview | Replace with a larger original |
| Theme requests an undersized image | Sharp in admin, soft on the page | Adjust theme image settings or sizes |
| High-DPI (retina) screen | Fine on a desktop monitor, soft on a phone | Upload at 2048 px so a larger variant is available |
| Aspect-ratio mismatch | Cropped and stretched look | One ratio across the catalogue |
| Small variant images | Main photo sharp, colour swatches soft | Give every variant the same resolution |
| Over-compression | Blotchy skin tones, halos around text | Raise quality, export from the original |
A two-minute diagnosis
Open the product page, right-click the image and inspect it. Compare the displayed (CSS) width with the natural width of the loaded file. On a 2x display the file needs at least twice the displayed pixel width, which is the device-pixel-ratio test Lighthouse-style audits use. A 400 px file displayed at 800 px is being upscaled, and no compressor will fix that.
If you edit your theme, Shopify’s performance team explains that the image_url filter in Liquid can resize, crop, pad and generate multiple formats through the Shopify CDN. That is how a theme can serve a right-sized file to each device.
Checking that images stay sharp everywhere
After any change, run the same short checklist:
- View the product page at desktop and mobile widths.
- Test on a standard display and a retina display or phone.
- Open the zoom function and look at edges, fabric texture and small text on labels.
- Flip through every variant: each should have the same resolution and ratio as the main image.
- Look at a collection page, where the same image appears small and cropping differences show up.
- Re-run PageSpeed Insights and compare with the baseline.
If a file fails step 3, the fix is nearly always to go back to the original and export at a higher quality or a larger size, not to compress again.
Where our approach differs
Compression is the last step of a longer chain: source quality, size, format, ratio, then weight. Most image problems on dropshipping stores begin at the first link, with supplier photos that are small, inconsistent or reused by every other store selling the same product.
EcomEye generates AI product images alongside unique titles and descriptions, imports product data from AliExpress, Amazon, Temu or competitor Shopify links, and exports to Shopify in one click. Building images and pages in one pass, in bulk, means the catalogue enters Shopify consistently instead of needing a rescue job later. Our posts on product image best practices for Shopify stores and AI backgrounds at 2048×2048 show how that fits a fast store.
Perspective
Most advice on image compression treats it as a clean-up job you do after the fact. We see it the other way round. If every product page in your store is made from the same kind of input, with the same dimensions, the same ratio and a unique image rather than a copied supplier photo, then compression becomes a setting you decide once, not a weekly chore.
That is why we built EcomEye around bulk creation. Each listing is uniquely generated, even when two users start from the same product link, so your images and copy are your own and your pages are built to avoid the duplicate-content and Merchant Center problems that sink so many Google dropshippers.
Get the source right, check one batch, then scale. Speed in a store starts at the moment the product page is created.
Koen
Build the catalogue once, with images that are ready
If you are scaling a Shopify dropshipping store, our AI product image generator creates unique product images in bulk, and the AI product description generator writes the matching copy. Plans on the pricing page start with Try-out at €39 per month, with Scaler at €99 per month.
FAQ
Does Shopify compress my product images automatically?
Shopify says images are not compressed when uploaded to the admin, but images served through a store theme might be. It also delivers WebP or AVIF to browsers that support them. You cannot turn that delivery behaviour off, so the best control is the quality of the file you upload.
What size should Shopify product images be?
For square product images, Shopify says 2048 x 2048 px usually displays best. Product and collection images can be up to 5000 x 5000 px or 25 megapixels, and the file must be under 20 MB. Keep the same aspect ratio across your catalogue.
What file size should a compressed product image be?
Shopify’s image optimization article recommends keeping final web images at 200 KB or smaller, and checking compressed files for blotchy detail. Some detailed photos need a little more, so judge by eye at the size shoppers see.
Why do my Shopify images look blurry?
The cause is often sizing rather than compression: a low-resolution source, a theme requesting a smaller image than the space needs, or a retina screen that needs about twice the displayed pixel width. Inspect the image on the page and compare its displayed width with the file’s natural width.
Should I use WebP, JPEG or PNG?
Use JPEG for photographs and PNG for transparency, text and flat graphics. Shopify serves WebP or AVIF automatically to supporting browsers, so you do not need to convert files yourself. If you do export WebP, always do it from the original rather than a previous export.
Sources
- Shopify Help Center: Uploading images
- Shopify Help Center: Product media types
- Shopify: Image Optimization, 8 Ways To Boost Store Speed
- Shopify: What Is a WebP File?
- Shopify Performance: Responsive images on Shopify with Liquid
- Unlighthouse: Fix Low Resolution Images
- Core Web Vitals: fix LCP, CLS, and INP
- How to Optimize Images for Better Website Performance
- How to Prepare Your Art Files for Print